
The software implements a DHCP/BOOTP Server based on RFC 2131. Besides the standard dynamic IP address assignment for clients the software supports the assignment of predefined profiles and static IP addresses to known hardware addresses or identifiers.
The server includes a multithreaded TFTP server for secure and reliable downloads.
The server supports all DHCP/BOOTP options and has no limitation in the number of clients.
On multi homed servers the software can handle up to 32 interfaces with one dynamic IP address pool per interface IP address.
User interface in English and German.
Address and parameter assignment can be based on:
- hardware address
- hardware address range (e.g. vendor bytes of MAC address)
- Server interface
- Client identifier
- Vendor or User class (as specified in RFC 3004)
- Relay IP address
- Relay Agent Information (as specified in RFC 3046) including support of normal and trusted server interfaces.
The DHCP Server is implemented as a native service for background operation, A Control Panel applet provides interactive access to the service.
The software is shareware.
Controlled parameter assignment to clients. No autoconfiguration. To control the usage of dynamic IP addresses, leasing can be restricted to known hardware addresses only. DHCP/BOOTP requests of unknown hardware addresses are logged, but not served in this mode of operation. The server can negate autoconfiguration requests of clients. DNS Update The server supports automatic DNS updates for DHCP configured clients. Controlled download of boot images To download files to the administered clients the software integrates a multithreaded TFTP server. Download can be restricted to the configured boot file of the client.
If you have questions regarding the DHCP server, please read the FAQ
If you need further information send us a mail.
Contents Of This Guide.
Содержание
Introduction:
Many of you might be aware of what DHCP server means and why you want to install it. So, those of you who know all about it can skip directly to the Installation part.
But there will still be some who have no idea what it is and installing it because they were told to or they need to.
We are going into detail about DHCP Server and its workings just for you people.
What is DHCP server?
The DHCP stands for Dynamic host Configuration Protocol.
As you must know that every computer or a device on a network has an IP address.
This Ip address is like the id of that particular computer or device on the network.
It identifies a particular computer or device on a network.
There are two ways in which you can assign an IP address to a computer or a device.
First one is Static IP and second one is Dynamic IP .
Static IP.
Here is how a static IP works.
A user has to assign a static IP manually.
That is the way it has been done since the beginning of networking.
For that you have to open the “Network configuration” of your windows if you are working on windows and then manually assign an IP address, a subnet mask and dns server to the computer or device.
And if you want to add new device or computer to the network, you will have to repeat these steps again and again.
And again you also have to make sure ip addresses are unique .
If the same ip address is assigned to more than one device on the network it will cause an ip conflict.
Both of the devices that were assigned the same IP address will be rendered useless as in they won’t be able to access the network.
DHCP:
That’s where DHCP comes in. It saves all the manual work and get the ip address directly from a DHCP server
It not only assigns the computer with an IP Address but it also assigns it with a Subnet mask, Default Gateway and a DNS server.
How it works?
The computer or device that wants access to the networks broadcasts a request asking for IP address.
It is then that the DHCP server sends a IP address to that particular computer or device from its pool.
The reason it is more popular than Static IP is that it’s automatic and saves hours of manual labour.
It also makes managing the entire network much easier in practice.
Scope:
DHCP assigns IP addresses to the devices on the network from it’s scope.
This scope is basically a range of IP addresses available to be allocated.
Here is an example of a scope.
Start IP Address: 11.0.0.1
End IP address : 11.0.0.100
As you can see the range starts at 11.0.0.1 and ends at 11.0.0.100.
What is means is that there are 98 IP address besides these two that can be allocated to devices in the network.
It could assign a device 11.0.0.56 or It could assign a device 11.0.0.3
The computer on the current network will get IP addresses from this range of IP addresses.
Lease:
IP addresses are leased by DHCP and not given.
Let’s take an example to explain it better.
Suppose the DHCP has just two IP addresses and it gives them away to Computer A and Computer B.
Let’s assume that Computer A has been given the IP address 11.0.0.1 and Computer B 11.0.0.2.
Now for some reason you want to remove Computer B from the network. When computer B is removed it keeps the IP address 11.0.0.2 with it.
You are looking to add a new computer, let’s say Computer C to the network. You place it in the network but the DHCP server has no IP addresses left to give.
Let’s rethink the entire thing in terms of a lease.
Lease is the amount of time an IP address is assigned to a computer.
So same scenario DHCP server with the same two IP addresses and it assigns them to computer A and Computer B respectively.
These addresses are leased and they will expire and return back to the DHCP server pool and DHCP server will be free to assign them to other computer even if Computer B was removed from the network.
Reservation:
Not all of you will be happy with the constant changing IP addresses.
So if you computer or device to be assigned the same IP Address you will have to make the required changes in the reservation table.
You are basically creating a reservation here.
The Reservation table will have following columns.
IP address || Device Name || MAC address
A reservation in this table ensures that the computer or the device can be identified by its mac address and it will always be given the same IP address when that device or computer broadcasts a request for IP address allocation.
So in short, reservations are not just handed out they are for VIP’s.
Jokes aside, it’s actually true. Reservations are given to the special devices or special computers.
Now that device could be a network printer, computer, server or routers.
Because these devices need to work with the same IP addresses.
Ethernet Interfaces.
During the installation of DHCP on ubuntu DHCP interfaces are necessary. We are talking about the Ethernet Interface here.
What is Ethernet Interface?
It is actually a network interface or card that has been installed on a computer system. It acts as a network client.
This network interface will connect your computer or a mobile device to the LAN network and it uses Ethernet medium for it.
How to install DHCP server in Linux:
You will learn how to install and how to configure DHCP server in ubuntu step by step:
This guide is not just limited to Ubuntu but you can also install DHCP server on redhat or fedora.
Update your packages with the following command.
Step 1. DHCP server installation.
The following linux DHCP command is the first step of installing DHCP server as well as configuring it.
This command is eligible if you are trying to install ubuntu 16.04 DHCP server.
When installing DHCP server on ubuntu a few of you might face the "unable to locate package isc-dhcp-server" error.
This happens becuase people usually forget to run or choose to ignore the sudo apt-get update command.
But it you are working with a Redhat or Fedora you will have to work with the following command.
Step 2. Basic DHCP configuration
This step includes defining a subnet.
Errors like isc-dhcp-server not configured to listen on any interfaces, no subnet declaration for ethO, or isc-dhcp-server failed to start will occur if you skip this step of installation.
The server you are working with might be connected to various networks subnets.
To start the installed DHCP server you will have to define at least one subnet inside the DHCP configuration file ("dhcp.conf").
When the conf file is open add the following lines of code to it.
This file tells the DHCP server to listen (i.e wait) for DHCP client request on the subnet 152.10.15.0 with netmask 255.255.255.0
This file also gave the DHCP server it’s scope. The range of IP address for it to assign. It will assign IP addresses from the range 152.10.15.3-152.10.15.254.
This is how you can add your subnet into the /etc/dhcp/dhcp.conf file.
Now restart your DHCP server using the following command.
Step 3. Lease Time.
Add the following lines to the config file.
The default lease time is the time period for which the DHCP server will lease an IP address to the device if a lease time is not provided by the client.
The max lease time it’s the maximum lease time that can be allocated to an assigned IP address by the DHCP server.
Step 4. Defining the DNS Server.
A] Your code before defining the DNS server.
B] Code after defining the DNS server.
We have made some changes to the above code. What we have don is, We have added a line about option domain-name-servers and mentioned the two DNS servers that we want our clients to use.
And then we added the option routers for a similar purpose.
C] Setting the default gateway.
We have added this line already to the last part of the code in the step 4 B]. We still have to add the line
option routers 152.10.15.1 to the DNS definition.
After you add the line. DHCP will set your DHCP client with the gateway 152.10.15.1.
Step 5. Reserving IP addresses for special devices.
If you have read the entire guide you must remember the "reservation table".
How the same IP address can be assigned to the same special device, every time it sends a broadcast request.
Here’s how you can do it. Consider the host to be one of the special devices you want to get a static IP for.
This is how you can configure DHCP. By adding these lines of codes to the dhcp.conf file.
In the above code, we used device’s MAC address to assign the fixed address 152.10.15.200 to the same device every time it requests for an IP address.
That concludes DHCP server installation for Linux.
Note:
Here’s a short not for users who want to know how to install DHCP server in ubuntu.
You can follow the same steps but you will also have to edit the /etc/network/interfaces file with the following code.
This is how you configure ubuntu DHCP client.
How to configure DHCP server in windows 7.
Step 1:
Go to the DHCP server website. Get the latest version for your windows 7.

Step 2:
Next step is to extract the content of the downloaded file.
Once that is done, double click on the dhcpwiz.exe file.
Step 3:
Dhcp configuration wizard. Click on "Next".

Step 4:
Network Interface cards.

The configuration wizard will present you with a list of identified network interfaces on your computer.
You have to select one from the list if you wish to configure DHCP on windows 7.
This interface will be used by the dhcp server.
Do not choose a network interface whose IP address has been assigned by DHCP server. It will lead to conflict.
After you select a network click on next.
Step 5:

Tick the HTTP(web server) checkbox.
Step 6:
Configuring DHCP for Interface

The IP-pool you can see in the configuration box is actually the scope that we just read about.
We need to configure a list of IP addresses (Range) as you can see in the above figure.
The range here is 192.168.1.1 — 192.168.1.254.
The following image displays the drop down list for lease time.

With the advance option you can define the subnet mask, gateway, DNS and WINS.

If you don’t define then the DHCP wizard will take it upon itself and define it automatically based on your network interface card.
Step 7:
Writing the INI file.

Click on Write INI file.
"INS file successfully written" will appear at the bottom in place of "Overwrite existing INI file".
Do not tick overwrite existing INI file checkbox.
Step 8:
As you can see the status is "Not installed"

Click on Install to continue with the process.

You’ll notice that the status will now say "Stopped".
Now move on to the next step.
Step 9:
Start the DHCP server program.
Click on start for that.

After you start the service the status will be set to running.
You can visit 127.0.0.1 in your web browser to check the status. It will be displayed to you as follows.

Note: You can stop the service when done by clicking on stop.

If you try to access 127.0.0.1 after stopping the service. You will see something like that in your browser.

Follow the same steps if you want to install and configure DHCP server for Windows 8 or Windows 10.
How to configure DHCP server in windows 2012 server step by step
This step by step installation works for windows server 2012 as well as windows server 2016.
DHCP installation and configuration in windows server 2012:
Step 1) Start the "Server Manager"
Step 2) Go to the "Dashboard".
Step 3) Select "Manage" then click on "Add Roles and Features".

Step 4) You will be greeted with a "Before you Begin" page.
Skim through the content of this window and if you satisfy all the conditions then move forward with the installation and click on "Next".
Step 5) Installation type.
Select the installation type. There are two options for you to select from.
One is the "Role-based on feature-based installation" and the other is "Remote Desktop Services installation.".

Select Role-based on feature-based installation.It configures a single server by adding roles, role services, and features.
Click on "Next".
Step 6) Server Selection.
You will be presented with a Server Pool.
Select a server from the list.
Then click on "Next".
Step 7) Server Roles.
From the roles listed find and tick DHCP Server.

It will take you to a Add roles and Features Wizard.
Tick the Include manage tools (if applicable) checkbox and then click on add features.
Step 8) Features.
You don’t mess around with those just click on Next.
Step 9) DHCP Server.
This window will explain in short what DHCP is.
And you should pay attention to the "Things to note:" section.
First, you need to have at least one static IP address on your computer.
The second thing is, you need to plan your subnets, scopes(range) and exclusions before you install the DHCP server.
Step 10) Confirmation.
Tick the "Restart the destination server automatically if required"
A dialogue box will open with the message "If a restart is
required, this server restarts automatically, without additional notifications. Do you want to allow automatic restart? as shown in the following image.

Then click on Install.
Step 11) After the installation is done. select the Complete DHCP configurations as shown in the image below.

It will open a configuration wizard.
DHCP Post-Install configuration wizard.
1) Description.
2) Authorization.
Fill in the appropriate username and then click on "commit".

3) Summary.
After you complete all these steps click on "close".
Setting The DHCP server
1) Go to Tools , select DHCP.

2) Select the entry in the DHCP section by clicking on it.
Right click on IPv4.
Select "New Scope".
It will open the New Scope Wizard.
3) Add the Name of scope and move to the next page.
Set the IP address range by adding the start IP address and the end IP address.

When you fill in the Start IP address the configurations settings that propagate to DHCP client will be automatically filled.
4) Add the range of IP addresses that you want to exclude from the scope. Or you could even type in a single IP address in the "Start IP address" section and click on add.

Here you can set the Lease duration. Set it and then click next.
5) Configure DHCP Options.
You can choose to configure Gateway,DNS servers and WINS settings now or later. Select the preferable option and click on next.
But here we are going to configure these options now.
So, when you click next you will be asked to add.
i) Gateway IP address, leave it empty and click on Next.
ii) Domain Name and DNS Servers.
Enter your domain name in the Parent domain text box.
Then add the IP address of your domain. in the IP address section.
Now click on next.
iii) As we don’t need WINS server we won’t make any changes just click on next again.
6) Next, you will be presented with an Activate scope screen.
Select yes and then click on next.
Click on Finish.
That completes the installation. You can now check the details like the scope, exclusion IP addresses or even the dns server in the DHCP window.
To open the DHCP management window again. You can open the run and then type in "dhcpmgmt.msc" and click on ok.
As we have already covered this section works, if you want to find out how to configure dhcp server in windows 2016 server step by step.
Conclusion
From the DHCP basics to the installation and configuration on variety of platforms this guide covers it all.
You won’t need to go to other sources if you want to find of what a certain thing means, just check the contents of this guide and then you can navigate to whichever section you want.
Furthermore if you are interested in knowing How to Create IP-Based Virtual Hosting? you can always refer 6 Fast Steps to Create IP based Virtual Hosting using Apache on Ubuntu.

Сервис, выдающий IP-адреса устройствам в локальной сети, кажется одним из самых простых и всем знакомых. Тем не менее у моих младших коллег до сих пор временами всплывают вопросы вроде «компьютер что-то получает какой-то странный адрес», а появление второго DHCP-сервера в одном сетевом сегменте вызывает некоторый трепет или проблемы в работе сети.
Чтобы у прочитавших этот материал такие вопросы не возникали, мне хотелось бы собрать в кучу основную информацию про работу механизмов выдачи адресов IP, особенности и примеры настройки отказоустойчивых и защищенных конфигураций. Да и возможно матерым специалистам будет интересно освежить нейронные связи.
Немного теории и решения интересных и не очень практических задач — под катом.
В современной локальной сети выдачей адресов обычно занимаются специализированные сервисы с поддержкой протоколов. Самым популярным из них является DHCP (Dynamic Host Configuration Protocol).
В принципе, специально для функционирования небольших сетей был создан стек технологий под названием Zeroconf. Он позволяет обойтись без каких-либо централизованных сервисов и серверов, включая, но не ограничиваясь выдачей IP-адресов. Им закрываются (ну, или почти закрываются) следующие вопросы:
Получение IP-адреса (Automatic Private IP Addressing или APIPA). Система сама назначает себе IP из сети 169.254.0.0/16 (кроме сеток /24 в начале и конце диапазона), основываясь на MAC-адресе и генераторе псевдослучайных чисел. Такая система позволяет избежать конфликтов, а адрес из этой сети называют link-local — в том числе и потому, что эти адреса не маршрутизируются.
Поиск по имени. Система анонсирует свое сетевое имя, и каждый компьютер работает с ним как с DNS, храня записи у себя в кэше. Apple использует технологию mDNS (Multicast DNS), а Microsoft — LLMNR (Link-local Multicast Name Resolution), упомянутую в статье «Домены, адреса и Windows: смешивать, но не взбалтывать».
Поиск сетевых сервисов. Например, принтеров. Пожалуй, самым известным протоколом является UPnP, который помимо прочего умеет сам открывать порты на роутерах. Протокол довольно сложен, в нем используется целый набор надстроек вроде использования http, в отличие от второго известного протокола — DNS-SD (DNS Service Discovery), который попросту использует SRV-записи, в том числе при работе mDNS.
При всех плюсах Zeroconf — без каких-либо сакральных знаний можно собрать рабочую сеть, просто соединив компьютеры на физическом уровне, — IT-специалистам он может даже мешать.

Немного раздражает, не так ли?
В системах Windows для отключения автонастройки на всех сетевых адаптерах необходимо создать параметр DWORD с именем IPAutoconfigurationEnabled в разделе HKEY_LOCAL_MACHINESYSTEMCurrentControlSetServicesTcpipParameters и поставить ему значение 0.
Разумеется, Zeroconf подходит разве что для небольших изолированных сетей (например, встретились с приятелем с ноутбуками, соединили их по Wi-Fi и давай играть Diablo II, не тратя время на какие-то сервера), да и выводить локальную сеть в интернет тоже хочется. Чтоб не мучаться со статическими настройками каждого компьютера, были созданы специальные протоколы, включая героя дня — DHCP.
Одна из первых реализаций протокола для выдачи IP-адресов появилась более 30 лет назад и называлась RARP (Reverse Address Resolution Protocol). Если немного упростить принцип его работы, то выглядело это так: клиент делал запрос на широковещательный адрес сети, сервер его принимал, находил в своей базе данных привязку MAC-адреса клиента и IP — и отправлял в ответ IP.
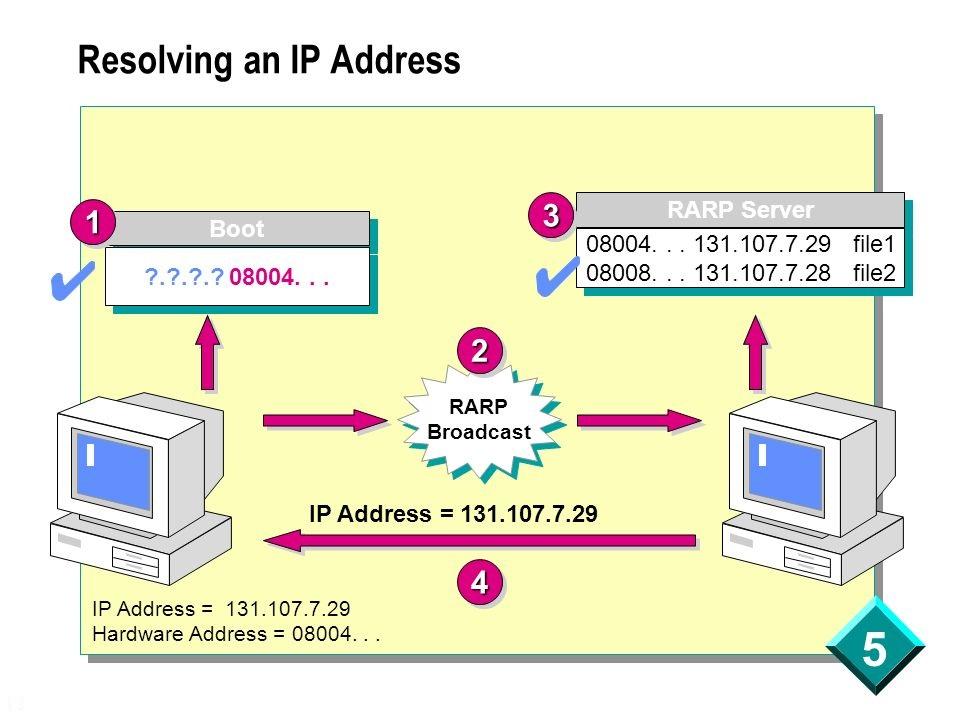
Схема работы RARP протокола.
И все вроде работало. Но у протокола были минусы: нужно было настраивать сервер в каждом сегменте локальной сети, регистрировать MAC-адреса на этом сервере, а передавать дополнительную информацию клиенту вообще не было возможности. Поэтому на смену ему был создан протокол BOOTP (Bootstrap Protocol).
Изначально он использовался для бездисковых рабочих станций, которым нужно было не только выдать IP-адрес, но и передать клиенту дополнительную информацию, такую, как адрес сервера TFTP и имя файла загрузки. В отличие от RARP, протокол уже поддерживал relay — небольшие сервисы, которые пересылали запросы «главному» серверу. Это сделало возможным использование одного сервера на несколько сетей одновременно. Вот только оставалась необходимость ручной настройки таблиц и ограничение по размеру для дополнительной информации. Как результат, на сцену вышел современный протокол DHCP, который является совместимым расширением BOOTP (DHCP-сервер поддерживает устаревших клиентов, но не наоборот).
Важным отличием от устаревших протоколов является возможность временной выдачи адреса (lease) и передачи большого количества разной информации клиенту. Достигается это за счет менее тривиальной процедуры получения адреса. Если в старых протоколах схема была простая, вида запрос-ответ, то теперь схема следующая:
- Клиент ищет сервер широковещательным запросом, запрашивая в том числе и дополнительные настройки.
- Сервер отвечает клиенту, предлагая ему IP-адрес и другие настройки.
- Клиент подтверждает принятую информацию широковещательным запросом, указав в подтверждении IP-адрес выбранного сервера.
- Сервер соглашается с клиентом, отправляя ему запрос, по получении которого клиент уже настраивает сетевой интерфейс или отвергает его.
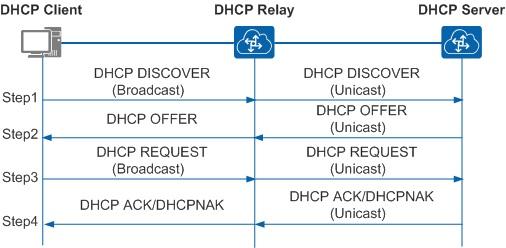
Схема общения клиента с сервером пересылки и сервером.
Подробнее про схему взаимодействия сервера и клиента и про структуру запросов и ответов можно почитать, например, в материале «Структура, формат и назначение DHCP пакетов».
На нескольких собеседованиях меня спрашивали: «А какой транспорт и порт использует DHCP?» На всякий случай отвечаем: «Сервер UDP:67, клиент UDP:68».
С разными реализациями DHCP-сервера сталкивались многие, даже при настройке домашней сети. Действительно, сейчас сервер есть:
- На практически любом маршрутизаторе, особенно SOHO.
- На системах Windows Server. О сервере и его настройке можно почитать в официальной документации.
- На системах *nix. Пожалуй, самое популярное ПО — ISC DHCP Server (dhcpd) и «комбайн» Dnsmasq.
Конкретных реализаций довольно много, но, например, на SOHO-маршрутизаторах настройки сервера ограничены. В первую очередь это касается дополнительных настроек, помимо классического «IP-адрес, маска, шлюз, сервер DNS». А как раз эти дополнительные опции и вызывают наибольший интерес в работе протокола. С полным списком можно ознакомиться в соответствующем RFC, я же разберу несколько интересных примеров.
В этом разделе я рассмотрю практическое применение опций DHCP на оборудовании MikroTik. Сразу обращу внимание на то, что не все опции задаются очевидно, формат параметров описан в wiki. Следует отметить также то, что опции клиент применяет, только когда сам их попросит. В некоторых серверах можно принудительно отправить настройки: например, в ISC DHCP Server за это отвечает директива dhcp-parameter-request-list, а в Dnsmasq —* *—dhcp-option-force. MikroTik и Windows такого не умеют.
Option 6 и Option 15. Начнем с простого. Настройка под номером 6 — это серверы DNS, назначаемые клиентам, 15 — суффикс DNS. Назначение суффикса DNS может быть полезным при работе с доменными ресурсами в недоменной сети, как я описывал в статье «Как мы сокращали персонал через Wi-Fi». Настройка MikroTik под спойлером.
Знание, что сервер DNS — это тоже опция, недавно пригодилось мне, когда разным клиентам нужно было выдать разные серверы DNS. Решение вида «выдать один сервер и сделать разные правила dst-nat на 53 порт» не подходило по ряду причин. Часть конфигурации снова под спойлером.
Option 66 и Option 67. Эти настройки пришли еще с BOOTP и позволяют указать TFTP-сервер и образ для сетевой загрузки. Для небольшого филиала довольно удобно установить туда микротик и бездисковые рабочие станции и закинуть на маршрутизатор подготовленный образ какого-нибудь ThinStation. Пример настройки DHCP:
Option 121 и Option 249. Используются для передачи клиенту дополнительных маршрутов, что может быть в ряде случаев удобнее, чем прописывать маршруты на шлюзе по умолчанию. Настройки практически идентичные, разве что клиенты Windows предпочитают вторую. Для настройки параметра маршруты надо перевести в шестнадцатеричный вид, собрав в одну строку маску сети назначения, адрес сети и шлюз. Также, по RFC, необходимо добавить и маршрут по умолчанию. Вариант настройки — под спойлером.
Предположим, нам нужно добавить клиентам маршрут вида dst-address=10.0.0.0/24 gateway=192.168.88.2, а основным шлюзом будет 192.168.88.1. Приведем это все в HEX:
| Данные для настройки | DEC | HEX |
| Маска | 24 | 0x18 |
| Сеть назначения | 10.0.0.0 | 0x0A 00 00 |
| Шлюз | 192.168.88.2 | 0xc0 a8 58 02 |
| Сеть по умолчанию | 0.0.0.0/0 | 0x00 |
| Шлюз по умолчанию | 192.168.88.1 | 0xc0 a8 58 01 |
Соберем все это счастье в одну строку и получим настройку:
Подробнее можно прочитать в статье «Mikrotik, DHCP Classless Route».
Option 252. Автоматическая настройка прокси-сервера. Если по каким-то причинам в организации используется непрозрачный прокси, то удобно будет настроить его у клиентов через специальный файл wpad (pac). Пример настройки такого файла разобран в материале «Proxy Auto Configuration (PAC)». К сожалению, в MiroTik нет встроенного веб-сервера для размещения этого файла. Можно использовать для этого пакет hotspot или возможности metarouter, но лучше разместить файл где-либо еще.
Option 82. Одна из полезнейших опций — только не для клиента, а для DHCP-релея. Позволяет передать серверу информацию о порте коммутатора, к которому подключен клиент, и id самого коммутатора. Сервер на основе этой информации в свою очередь может выдать уже клиенту какой-то определенный набор настроек или просто занести в лог — чтобы в случае необходимости найти порт подключения клиента, не приходилось заходить на все свитчи подряд (особенно, если они не в стеке).
После настройки DHCP-Relay на маршрутизаторе в информации о клиентах появятся поля Agent Circuit ID и Agent Remote ID, где первое — идентификатор порта коммутатора, а второе — идентификатор самого коммутатора.

Выдача адресов с option 82.
Информация выдается в шестнадцатиричном формате. Для удобства восприятия при анализе журнала DHCP можно использовать скрипты. Например, решение для решения от Microsoft опубликовано в галерее скриптов Technet под названием «Декорирование DHCP опции 82».
Также опция Option 82 активно используется в системе биллинга провайдеров и при защите сети от посторонних вмешательств. Об этом чуть подробнее.
Ввиду простоты протокола и присутствия широковещательных запросов есть эффективные атаки на инфраструктуру — в основном типа MITM («человек посередине»). Атаки производятся посредством поднятия своего DHCP-сервера или релея: ведь если контролировать выдачу сетевых настроек, можно запросто перенаправить трафик на скомпрометированный шлюз. Для облегчения атаки используется DHCP starvation (представляясь клиентом или релеем, злоумышленник заставляет «родной» DHCP-сервер исчерпать свои IP-адреса). Подробнее про реализацию атаки можно почитать в статье «Атакуем DHCP», методом же защиты является DHCP Snooping.
Это функция коммутатора, которая позволяет «привязать» DHCP-сервер к определенному порту. Ответы DHCP на других портах будут заблокированы. В некоторых коммутаторах можно настроить и работу с Option 82 при ее обнаружении в пакете (что говорит о присутствии релея): отбросить, заменить, оставить без изменения.
В коммутаторах MikroTik включение DHCP Snooping производится в настройках бриджа:
Настройка в других коммутаторах происходит аналогичным образом.
Стоит отметить, что не все модели MikroTik имеют полную аппаратную поддержку DHCP Snooping — она есть только у CRS3xx.
Помимо защиты от злых хакеров эта функция избавит от головной боли, когда в сети появляется другой DHCP-сервер — например, когда SOHO-роутер, используемый как свич с точкой доступа, сбрасывает свои настройки. К сожалению, в сетях, где встречается SOHO-оборудование, не всегда бывает грамотная структура кабельной сети с управляемыми маршрутизаторами. Но это уже другой вопрос.

Красивая коммутационная — залог здоровья.
К другим методам защиты можно отнести Port Security («привязка» определенного MAC-адреса к порту маршрутизатора, при обнаружении трафика с других адресов порт будет блокироваться), Анализ трафика на количество DHCP-запросов и ответов или ограничение их количества, ну и, конечно, различные системы IPSIDS.
Если говорить не только о защите сети, но и о надежности, то не лишним будет упомянуть и про возможности отказоустойчивого DHCP. Действительно, при своей простоте DHCP часто бывает одним из ключевых сервисов, и при выходе его из строя работа организации может быть парализована. Но если просто установить два сервера с идентичными настройками, то ни к чему, кроме конфликта IP-адресов, это не приведет.
Казалось бы, можно поделить область выдачи между двумя серверами, и пусть один выдает одну половину адресов, а второй — другую. Вот только парализованная половина инфраструктуры немногим лучше, чем целая.
Разберем более практичные варианты.
В системах Windows Server начиная с 2012 система резервирования DHCP работает «из коробки», в режиме балансировки нагрузки (active-active) или в режиме отказоустойчивости (active-passive). С подробным описанием технологии и настройками можно ознакомиться в официальной документации. Отмечу, что отказоустойчивость настраивается на уровне зоны, поэтому разные зоны могут работать в разном режиме.
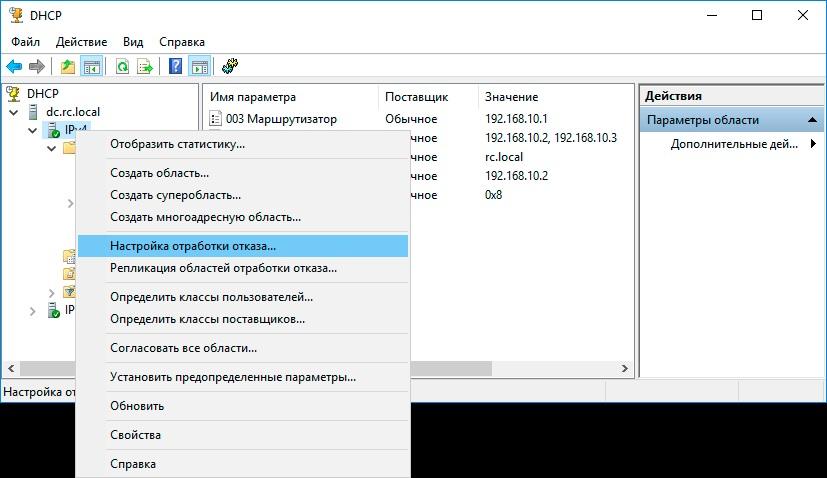
Настройка отказоустойчивости DHCP-сервера в Windows.
В ISC DHCP Server для настройки отказоустойчивости используется директива failover peer, синхронизацию данных предлагается делать самостоятельно — например, при помощи rsync. Подробнее можно почитать в материале «Два DHCP сервера на Centos7. »
Если же делать отказоустойчивое решение на базе MikroTik, то без хитростей не обойтись. Один из вариантов решения задачи был озвучен на MUM RU 18, а затем и опубликован в блоге автора. Если вкратце: настраиваются два сервера, но с разным параметром Delay Threshold (задержка ответа). Тогда выдавать адрес будет сервер с меньшей задержкой, а с большей задержкой — только при выходе из строя первого. Синхронизацию информации опять же приходится делать скриптами.
Лично я в свое время изрядно потрепал себе нервов, когда в сети «случайно» появился роутер, подключенный в локальную сеть и WAN, и LAN интерфейсами.
Расскажите, а вам приходилось сталкиваться с проказами DHCP?


