Исходные данные
Настройка единого пространства пользователей (ЕПП) в сети компьютеров рассматривается на примере следующей ситуации.
Настройку ЕПП необходимо выполнить в сети, изображенной на рисунке.

где АРМ – это сокращение от «автоматизированное рабочее место».
На сервере, АРМ 1 и АРМ 2 установлена операционная система специального назначения «Astra Linux Special Edition» РУСБ.10015-01 (1.5 «Смоленск») с параметрами, заданными в программе установки этой операционной системы по умолчанию.
Далее для операционной системы специального назначения «Astra Linux Special Edition» РУСБ.10015-01 (1.5 «Смоленск») используется обозначение «ОССН «Astra Linux SE».
С учетом информации на сайте разработчиков ОССН «Astra Linux SE, для назначения компьютерам IP-адресов необходимо использовать сетевую службу «networking» и сетевой интерфейс «eth0».
Домен должен иметь имя «epp».
В домен необходимо добавить информацию о пользователях в соответствии с информацией в таблицах.
Таблица «Пользователи домена»
Таблица «Группы домена»
Таблица «Информация о пользователе 1»
Таблица «Информация о пользователе 2»
Настройка сервера
Для настройки сервера необходимо выполнить следующие действия:
– назначить серверу IP-адрес;
– настроить систему разрешения доменных имен;
– настроить систему синхронизации времени;
Для назначения серверу IP-адреса необходимо выполнить следующие действия:
– войти в ОССН «Astra Linux SE» с правами администратора;
– получить права пользователя «root» с использованием команды «sudo su»;
– завершить работу графической утилиты конфигурирования сети «fly-admin-wicd» с использованием команды «killall fly-admin-wicd»;
– завершить работу демона «Wicd» с использованием команды «service wicd stop». Если демон «Wicd» работал с настройками по умолчанию, то необходимо также завершить работу клиента «DHCP» с использованием команды «killall dhclient»;
– запретить автозапуск графической утилиты конфигурирования сети «fly-admin-wicd» в начале работы ОССН «Astra Linux SE» с использованием команды «rm /etc/xdg/autostart/fly-admin-wicd.desktop»;
– запретить автозапуск демона «Wicd» в начале работы ОССН «Astra Linux SE» с использованием команды «update-rc.d wicd disable»;
– указать в файле «/etc/network/interfaces» информацию о сетевом интерфейсе «eth0»:
auto eth0
iface eth0 inet static
address 192.168.0.10
netmask 255.255.255.0
gateway 192.168.0.10
network 192.168.0.0
broadcast 192.168.0.255
– удалить информацию об адресах для сетевого интерфейса «eth0» с использованием команды «ip addr flush dev eth0»;
– перезапустить сетевую службу «networking» с использованием команды «/etc/init.d/networking restart».
Для настройки системы разрешения доменных имен необходимо выполнить следующие действия:
– войти в ОССН «Astra Linux SE» с правами администратора;
– получить права пользователя «root» с использованием команды «sudo su»;
– назначить серверу полностью определенное доменное имя. Для этого в файле «/etc/hosts» вместо строки:
192.168.0.10 server.epp server
– установить сервер службы доменных имен с использованием команды «apt-get install bind9»;
– добавить в файл «/etc/bind/named.conf.local» информацию, необходимую для преобразования доменных имен в IP-адреса и обратно:
zone "epp" <
type master;
file "/var/cache/bind/db.epp";
>;
zone "0.168.192.in-addr.arpa" <
type master;
file "/var/cache/bind/db.epp.rev";
>;
– создать файл «/var/cache/bind/db.epp» и указать в нем информацию, необходимую для преобразования доменных имен в IP-адреса:
;
; BIND data file for epp zone
;
$TTL 604800
@ IN SOA epp. root.epp. (
2017061601 ; Serial
604800 ; Refresh
86400 ; Retry
2419200 ; Expire
604800 ) ; Negative Cache TTL
;
@ IN NS server.epp.
@ IN A 192.168.0.10
server IN A 192.168.0.21
arm1 IN A 192.168.0.21
arm2 IN A 192.168.0.22
ВНИМАНИЕ! В конце файла «/var/cache/bind/db.epp» обязательно должен быть символ перевода строки;
– создать файл «/var/cache/bind/db.epp.rev» и указать в этом файле информацию, необходимую для преобразования IP-адресов в доменные имена:
;
; BIND reverse data file for epp zone
;
$TTL 86400
@ IN SOA epp. root.epp. (
2017061601 ; Serial
604800 ; Refresh
86400 ; Retry
2419200 ; Expire
604800 ) ; Negative Cache TTL
;
@ IN NS server.epp.
10 IN PTR server.epp.
21 IN PTR arm1.epp.
22 IN PTR arm2.epp.
ВНИМАНИЕ! В конце файла «/var/cache/bind/db.epp.rev» обязательно должен быть символ перевода строки;
– перезапустить сервер службы доменных имен с использованием команды «/etc/init.d/bind9 restart»;
– создать файл «/etc/resolv.conf» и указать в этом файле информацию, необходимую для преобразования доменных имен в IP-адреса и обратно:
domain epp
search epp
nameserver 192.168.0.10
Для настройки системы синхронизации времени необходимо выполнить следующие действия:
– войти в ОССН «Astra Linux SE» с правами администратора;
– получить права пользователя «root» с использованием команды «sudo su»;
– установить, что время в сети необходимо синхронизировать со временем на сервере. Для этого в файле «/etc/ntp.conf» вместо строк:
server 0.debian.pool.ntp.org iburst
server 1.debian.pool.ntp.org iburst
server 2.debian.pool.ntp.org iburst
server 3.debian.pool.ntp.org iburst
server 127.127.1.0
fudge 127.127.1.0 stratum 10
– указать, что синхронизировать время могут только компьютеры сети. Для этого в файле «/etc/ntp.conf» добавить строку:
restrict 192.168.0.0 mask 255.255.255.0 nomodify notrap
– обеспечить автозапуск сервера единого сетевого времени. Для этого выполнить команду «update-rc.d ntp defaults»;
Для создания домена необходимо выполнить следующие действия:
– войти в ОССН «Astra Linux SE» с правами администратора;
– получить права пользователя «root» с использованием команды «sudo su»;
– установить сервер и клиента «ALD» с использованием команды «apt-get install ald-server-common»;
– указать, что сервер «ALD» должен работать. Для этого в файле «/etc/ald/ald.conf» указать значение «1» у параметра «SERVER_ON»;
– указать, что клиент «ALD» должен работать. Для этого в файле «/etc/ald/ald.conf» указать значение «1» у параметра «CLIENT_ON»;
– создать домен с использованием команды «ald-init init». В процессе выполнения этой команды необходимо задать и запомнить пароль для базы данных программы «Kerberos» и пароль администратора домена.
Для проверки правильности создания домена необходимо выполнить следующие действия:
– войти в ОССН «Astra Linux SE» с правами администратора;
– получить права пользователя «root» с использованием команды «sudo su»;
– выполнить команду «ald-client status» или команду «ald-admin test-integrity».
Настройка АРМ 1
Для настройки АРМ 1 необходимо выполнить следующие действия:
– назначить АРМ 1 IP-адрес;
– настроить систему разрешения доменных имен;
– настроить систему синхронизации времени;
– ввести АРМ 1 в домен.
Для назначения АРМ 1 IP-адреса необходимо выполнить следующие действия:
– войти в ОССН «Astra Linux SE» с правами администратора;
– получить права пользователя «root» с использованием команды «sudo su»;
– завершить работу графической утилиты конфигурирования сети «fly-admin-wicd» с использованием команды «killall fly-admin-wicd»;
– завершить работу демона «Wicd» с использованием команды «service wicd stop». Если демон «Wicd» работал с настройками по умолчанию, то необходимо также завершить работу клиента «DHCP» с использованием команды «killall dhclient»;
– запретить автозапуск графической утилиты конфигурирования сети «fly-admin-wicd» в начале работы ОССН «Astra Linux SE» с использованием команды «rm /etc/xdg/autostart/fly-admin-wicd.desktop»;
– запретить автозапуск демона «Wicd» в начале работы ОССН «Astra Linux SE» с использованием команды «update-rc.d wicd disable»;
– указать в файле «/etc/network/interfaces» информацию о сетевом интерфейсе «eth0»:
auto eth0
iface eth0 inet static
address 192.168.0.21
netmask 255.255.255.0
gateway 192.168.0.10
network 192.168.0.0
broadcast 192.168.0.255
– удалить информацию об адресах для сетевого интерфейса «eth0» с использованием команды «ip addr flush dev eth0»;
– перезапустить сетевую службу «networking» с использованием команды «/etc/init.d/networking restart».
Для настройки системы разрешения доменных имен необходимо выполнить следующие действия:
– войти в ОССН «Astra Linux SE» с правами администратора;
– получить права пользователя «root» с использованием команды «sudo su»;
– назначить АРМ 1 полностью определенное доменное имя. Для этого в файле «/etc/hosts» вместо строки:
192.168.0.21 arm1.epp arm1
– создать файл «/etc/resolv.conf» и указать в этом файле информацию, необходимую для преобразования доменных имен в IP-адреса и обратно:
domain epp
search epp
nameserver 192.168.0.10
Для настройки системы синхронизации времени необходимо выполнить следующие действия:
– войти в ОССН «Astra Linux SE» с правами администратора;
– получить права пользователя «root» с использованием команды «sudo su»;
– указать, что время должно синхронизироваться с периодичностью в 10 минут. Для этого создать файл «/etc/cron.d/ntpdate» и добавить в этот файл строку:
*/10 * * * * root /usr/sbin/ntpdate server.epp
Для ввода АРМ 1 в домен необходимо выполнить следующие действия:
– войти в ОССН «Astra Linux SE» с правами администратора;
– получить права пользователя «root» с использованием команды «sudo su»;
– установить клиента «ALD» с использованием команды «apt-get install ald-client-common»;
– указать, что клиент «ALD» должен работать. Для этого в файле «/etc/ald/ald.conf» указать значение «1» у параметра «CLIENT_ON»;
– ввести АРМ 1 в домен с использованием команды «ald-client join server.epp».
Для проверки правильности ввода АРМ 1 в домен необходимо выполнить следующие действия:
– войти в ОССН «Astra Linux SE» с правами администратора;
– получить права пользователя «root» с использованием команды «sudo su»;
– выполнить команду «ald-client status».
Настройка АРМ 2
Настройку АРМ 2 необходимо выполнить аналогично настройке АРМ 1.
Добавление в домен информации о пользователях
Для добавления в домен информации о пользователях необходимо выполнить следующие действия:
– настроить программу «Доменная политика безопасности»;
– добавить в домен информацию о пользователях с использованием программы «Доменная политика безопасности».
Для настройки программы «Доменная политика безопасности» необходимо выполнить следующие действия:
– войти в ОССН «Astra Linux SE» с правами администратора;
– получить права пользователя «root» с использованием команды «sudo su»;
– установить программу «Доменная политика безопасности» с использованием команды «apt-get install fly-admin-ald fly-admin-ald-se».
Для добавления в домен информации о пользователях с использованием программы «Доменная политика безопасности» необходимо выполнить следующие действия:
– войти в ОССН «Astra Linux SE» с правами администратора;
– запустить программу «Доменная политика безопасности» с использованием ярлыка в меню приложений в разделе «Настройка»;

– в окне для ввода имени и пароля пользователя оставить без изменения имя пользователя и указать пароль администратора домена (указанный при создании домена) и нажать на кнопку «Да»;

– добавить в домен информацию о пользователях в соответствии с исходными данными.
Использование ЕПП
Для использования ЕПП после его настройки необходимо войти в ОССН «Astra Linux SE» на АРМ 1 или АРМ 2 с правами пользователя домена, при этом кроме имени пользователя и пароля необходимо указать уровень конфиденциальности.
С уважением, Анатолий Борисов, СПБ ЦГТ
17.02.2019
| hostname | Операционная система | Роли | ip-адрес |
|---|---|---|---|
| dc01.example.com | Windows Server 2008R2 | Контроллер домена; DNS сервер | 192.168.0.1 |
| astra01 | Astra Linux SE релиз Смоленск 1.6 | Рабочая станция, член домена | 192.168.0.10 |
Для успешного ввода Astra Linux в домен Active Directory следует в качестве DNS сервера указать DNS сервер Active Directory.
1) ПКМ на иконке NetworkManager в системном трее → "Изменить соединения. "
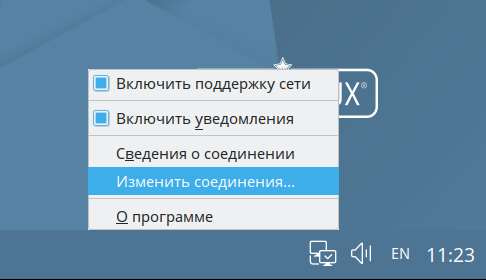
2) В открывшемся окне выберите используемое соединение и дважды кликните по нему.
3) На вкладке "Параметры IPv4" задайте ip адрес, маску сети и шлюз (при необходимости), а так же DNS сервер.
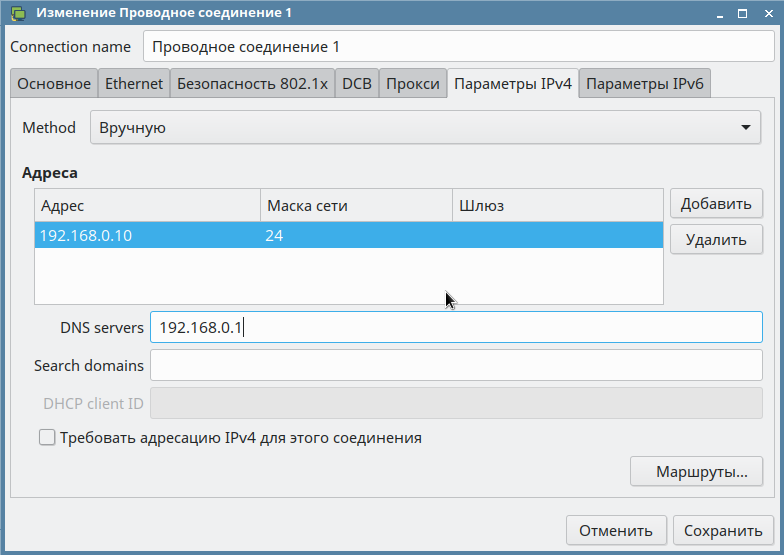
4) Нажмите "Сохранить"
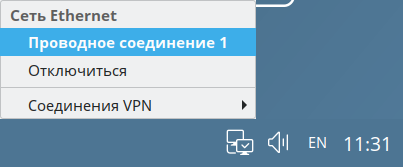
5) Что бы изменения вступили в силу ЛКМ на иконке NetworkManager в системном трее, после чего кликните на используемом соединении.
В Astra Linux присутствует графическая утилита для ввода компьютера в домен Active Directory.
Установить ее можно с помощью консольных утилит apt, apt-get или aptitude, а так же с помощью графического менеджера пакетов Synaptic.
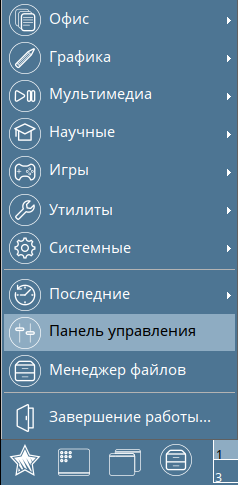
1) Откройте "Панель управления"
2) Выберите раздел "Сеть" → "Настройка клиента Active Directory"
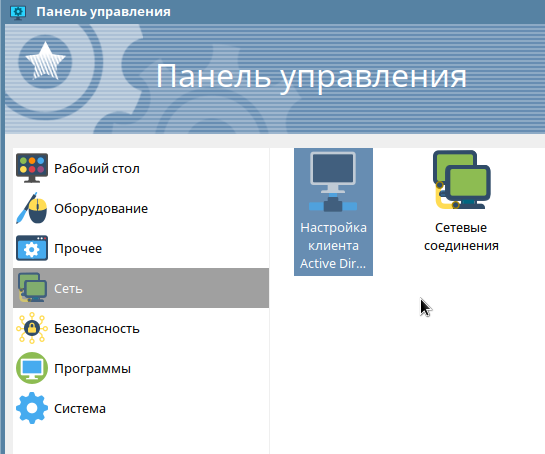
3) Заполните все поля и нажмите "Подключиться"
Account providers
NethServer supports authentication and authorization against either a local or remote account provider.
Supported provider types are:
- Local OpenLDAP running on NethServer itself
- Remote LDAP server with RFC2307 schema
- Local Samba 4 Active Directory Domain Controller
- Remote Active Directory (both Microsoft and Samba)
The root user can configure any type of accounts prov >Accounts provider page.
Be aware of the following rule about account providers:
Please choose wisely your account provider because the choice could not be reversible. Also the system will forbid any change to the FQDN after the account provider has been configured.
Choosing the right account provider
Besides choosing to bind a remote provider or install a local one, the administrator has to decide which backend type suits his needs.
The File server module of NethServer, which enables the Shared folders page, can authenticate SMB/CIFS clients only if NethServer is bound to an Active Directory domain. The LDAP prov >Shared folders only in guest mode. See Shared folders .
On the other hand, the local OpenLDAP provider is more easy to install and configure.
In the end, if the SMB file sharing protocol support is not required, an LDAP provider is the best choice.
OpenLDAP local provider installation
To install and configure an OpenLDAP local accounts prov >Accounts provider > LDAP > Install locally . The system needs a working internet connection to download additional packages.
At the end of the installation the package is automatically configured and the administrator will be able to manage users and groups from the User and groups page.
See Admin account section for more details about default administrative user and group.
Samba Active Directory local provider installation
When installing Samba Active Directory as local account provider, the system needs an additional IP address and a working internet connection.
The additional IP is assigned to a Linux Container that runs the Active Directory Domain Controller roles and must be accessible from the LAN (green network).
Therefore the additional IP address must satisfy three conditions:
- the IP address has to be free; it must not be used by any other machine
- the IP address has to be in the same subnet range of a green network
- the green network has to be bound to a bridge interface where the Linux Container can attach its virtual interface; the installation procedure can create the bridge interface automatically, if it is missing
To install a local Active Directory accounts prov >Accounts provider > Active Directory > Create a new domain .
The DNS domain name defines the DNS suffix of the new domain. NethServer acts as an authoritative DNS server for that domain. See also DNS and AD domain .
The Domain Controller IP address field must be filled with the additional IP address explained above.
When all fields are filled, press the Create domain button.
The Active Directory DNS domain name and NetBIOS domain name values cannot be changed once that the domain has been created
The Active Directory configuration procedure might require some time to run. It creates the Linux Container chroot, by downloading additional packages.
The Linux Container root directory is /var/lib/machines/nsdc/ and requires the filesystem support to Posix ACLs. The default XFS filesystem has a builtin support for Posix ACLs and no special configuration is required. For other filesystems (i.e. EXT4) enable the ACLs as explained in Shared folders requirements .
At the end of the Active Directory configuration procedure, the NethServer host machine is automatically configured to join the Active Directory domain. Go to the page User and groups to see the default accounts.
The previously assigned IP address can be changed from Accounts provider > Change IP .
Changing the Domain Controller IP address can cause problems to Active Directory clients. If they use an external DNS server, update it to use the new IP address.
After installing Samba Active Directory, the Users and groups page has two default entries; both are disabled: administrator and admin. “Administrator” is the default Active Directory privileged account and is not required by NethServer; it is safe to keep it disabled. “admin” is defined by NethServer as the default system administrative account. It is member of the AD “domain admins” group. See Admin account section for more details.
DNS and AD domain
An Active Directory domain requires a reserved DNS domain to work. It is a good choice to allocate a subdomain of the public DNS domain for it. The AD subdomain can be accessible only from LAN (green) networks.
- public (external) domain: nethserver.org
- server FQDN: mail.nethserver.org
- Active Directory (internal LAN only) domain: ad.nethserver.org
- domain controller FQDN (assigned by default): nsdc-mail.ad.nethserver.org
When choosing a domain for Active Directory use an internal domain which is a subdomain of the external domain [1]
Installing on a virtual machine
Samba Active Directory runs inside a Linux Container which uses a virtual network interface bridged to the network interface of the system. The virtual network interface has to be visible inside the physical network, but often virtualization solutions block ARP traffic. As a result, the Samba Active Directory container is not visible from LAN hosts.
When installing on virtual environment, make sure the virtualization solution allows traffic in promiscuous mode.
VirtualBox
To setup the promiscuous mode policy, select “Allow all” from the drop down list located in the network settings section.
VMWare
Enter the networking configuration section of the virtualization mode and set the virtual switch in promiscuous mode.
Make sure the virtual machine is bridged to a real bridge (like br0) and the bridge is put in promiscuous mode.
It is possible to force a br > br0 ) in promiscuous mode using this command:
Hyper-V
Configure MAC Address Spoofing for Virtual Network Adapters [2]
Local accounts provider uninstall
Both LDAP and AD local accounts prov >Accounts provider > Uninstall page.
When the local accounts provider DB is uninstalled, any user, group and computer account is erased.
A list of users and groups in TSV format is dumped to /var/lib/nethserver/backup/users.tsv and /var/lib/nethserver/backup/groups.tsv . See also Import and delete accounts from plain-text files .
Existing files owned by users and groups must be removed manually. This is the list of system directories containing users and groups data:
Join an existing Active Directory domain
Here NethServer is bound to a remote Active Directory account provider. It can be provided by either Samba or Microsoft implementations. In this scenario NethServer becomes a trusted server of an existing Active Directory domain. When accessing a NethServer resource from a domain workstation, user credentials are checked against one of the domain controllers, and the access to the resource is granted.
Joining an Active Directory domain has the following pre-requisite:
After the prerequisite is fulfilled, proceed to the page Accounts provider > Active Directory > Join a domain .
- Enter the DNS domain name of the AD domain. The NetBIOS domain name (domain short name) is probed automatically.
- Fill the AD DNS server field. Usually it is the IP address of an AD domain controller.
- Prov >User name and Password of an AD account with the privilege of joining a computer to the domain. Remember that the default administrator account could be disabled!
Some additional modules, like Nextcloud, WebTop, Roundcube, Ejabberd require read-only access to AD LDAP services. To be fully operational they require an additional account to perform simple LDAP binds.
Create a dedicated user account in AD, and set a complex non-expiring password for it.
Once NethServer has successfully joined AD, specify the dedicated user account credentials in Accounts provider > Authentication credentials for LDAP applications .
Bind to a remote LDAP server
To configure a remote LDAP accounts prov >Accounts provider > LDAP > Bind remotely .
Type the LDAP server IP address in the field Host name or IP . If the LDAP service runs on a non-standard TCP port, specify it in TCP port .
Then an LDAP rootDSE query is sent to the specified host and a form is filled with returned data. Check the values are correct then press the Save button to confirm.
If the LDAP server requires authentication, fill in the fields under Authenticated bind . Enable either ldaps:// or STARTTLS to encrypt the connection.
If the remote LDAP server is also a NethServer installation and it is in the LAN (green) network, select Anonymous bind
Users
A newly created user account remains locked until it has set a password. Disabled users are denied to access system services.
When creating a user, following fields are mandatory:
- User name
- Full name (name and surname)
A user can be added to one or more group from the Users page or from the Groups one.
Sometimes you need to block user access to services without deleting the account. The safest approach is:
- lock the user using the Lock action
- (optionally) change the user’s password with a random one
When a user is deleted, the home directory and personal mail box will be also deleted.
Changing the password
If there wasn’t given an initial password during user creation, the user account is disabled. To enable it, set a password using the Change password button.
When a user is enabled, the user can access the Server Manager and change his/her own password by going to the user@domain.com label on the upper right corner of the screen and clicking on Profile .
Credentials for services
The user’s credentials are the user name and his password. Credentials are required to access the services installed on the system.
The user name can be issued in two forms: long (default) and short. The long form is always accepted by services. It depends on the service to accept also the short form.
For instance if the domain is example.com and the user is goofy:
User long name form goofy@example.com User short name form goofy
To access a shared folder, see also Network access .
User home directories
User home directories are stored ins > /var/lib/nethserver/home directory, in order to simplify the deployment of a single-growing partition system.
The administrator can still restore the well-known /home path using the bind mount:
Groups
A group of users can be granted some permission, such as authorize access over a shared folder . The granted permission is propagated to all group members.
Two special groups can be created. Members of these groups are granted access to the panels of the Server Manager:
- domain admins: members of this group have the same permissions as the root user from the Server Manager.
- managers: members of this group are granted access to the Management section of the Server Manager.
Admin account
If a local AD or LDAP provider is installed, an admin user, member of the domain admins group is created automatically. This account allows access to all configuration pages within the Server Manager. It is initially disabled and has no access from the console.
To enable the admin account set a password. Also remember to enable the shell if the admin user must access the new Server Manager.
Where applicable, the admin account is granted special privileges on some specific services, such as joining a workstation to an Active Directory domain.
If NethServer is bound to a remote account provider, the admin user and domain admins group could be created manually, if they do not already exist.
If a user or group with a similar purpose is already present in the remote account provider database, but it is named differently, NethServer can be configured to rely on it with the following commands:
Password management
The system prov >complexity and expiration.
Password policies can be changed from web interface.
Complexity
The password complexity is a set of minimum conditions for password to be accepted by the system: You can choose between two different management policies about password complexity:
- none: there is no specific control over the password entered, but minimum length is 7 characters
- strong
The strong policy requires that the password must comply with the following rules:
- Minimum length of 7 characters
- Contain at least 1 number
- Contain at least 1 uppercase character
- Contain at least 1 lowercase character
- Contain at least 1 special character
- At least 5 different characters
- Must be not present in the dictionaries of common words
- Must be different from the username
- Can not have repetitions of patterns formed by 3 or more characters (for example the password As1.$ AS1. $ is invalid)
- If Samba Active Directory is installed, also the system will enable password history
The default policy is strong.
Changing the default policies is highly discouraged. The use of weak passwords often lead to compromised servers by external attackers.
Expiration
The password expiration is NOT enabled by default.
Each time a user changes his password, the date of the password change is recorded and, if Password expiration for users option is enabled, the password is cons >Maximum Password Age has elapsed.
For example, given that
- last password was set in January,
- in October the Maximum Password Age is set to 180 days and Password expiration for users is enabled
thus the password is immediately cons >
Effects of expired passwords
no email notification related to password expiration is sent by the server!
The effects of an expired password depend on the configured accounts provider.
When a password is expired
- with Active Directory (both local and remote) a user cannot authenticate himself with any service;
- with a NethServer LDAP accounts provider (both local and remote) some services ignore the password expiration and grant access in any case.
Examples of services that do not fully support the password expiration with NethServer LDAP accounts provider:
- NextCloud
- WebTop (contacts and calendars are available)
- SOGo
…and other services that authenticate directly with LDAP
Import and delete accounts from plain-text files
Import users
It is possible to create user accounts from a TSV (Tab Separated Values) file with the following format: