
The DNS server isn’t responding error is one of the most common DNS errors which you will experience while connecting to the internet in Windows operating systems.
The DNS server not responding error is extremely common and even if the internet connection settings are properly configured on your Windows computer there is a high possibility that you will still get this DNS server error The DNS server isn’t responding .
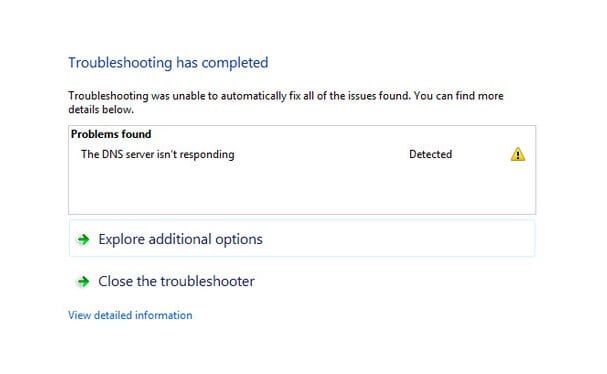
Fix “The DNS server isn’t responding” error in Windows 7/8/10
Today in this how-to-fix tutorial, we are going to tell everything about the DNS server error (what is a DNS Server and what does DNS server not responding mean?) and how to fix “The DNS server isn’t responding” error in Windows 10, 8, 7 operating system. Let’s see now.
You may also be interested in checking out:
What is a DNS Server?
DNS or Domain Name server is a technology which helps in the management of the public as well as domain names of all the websites. One can think of DNS as a phonebook where the phone numbers of a person are written right next to their name.
With the help of DNS, you just have to enter the URL address and your computer will detect the address automatically with the help of domain name server. You can also follow this DNS server guide to know in details about what is DNS server? Why you should change DNS Server address? How to change DNS server on Windows, Mac, and Android with the best public DNS servers? etc.
What Does DNS server not responding Mean?
Before we tell you how to fix DNS server not responding issue on your computer, let’s find out what does The DNS server isn’t responding mean.
The main reason that you are getting this error on your computer is because of the incorrect hosts file on your computer. If the host names inside the hosts file of your computer are having an outdated listing it will lead to DNS server not responding error and you won’t be able to connect with the internet.
Simply, you have to make changes to the hosts file manually as this will help you in configuring The DNS server isn’t responding problem. You can open the hosts file using notepad and then search for the website to which you are not able to connect. Delete that website and save your hosts file and you should open that website easily without any error.
How to Fix “The DNS server isn’t responding” in Windows 10 / 8 / 7
Now that you know what does DNS server not responding mean and also know the reason behind this DNS server error, let’s follow the methods which will help you in solving “The DNS server isn’t responding” in Windows 10, 8, and 7 computers. Here we go:
Method 1: Fix the DNS server isn’t responding Problem
Before you start following this method we suggest you to take backup of the router settings and the firmware. This will help you in case anything goes wrong and you can restore back to the settings.
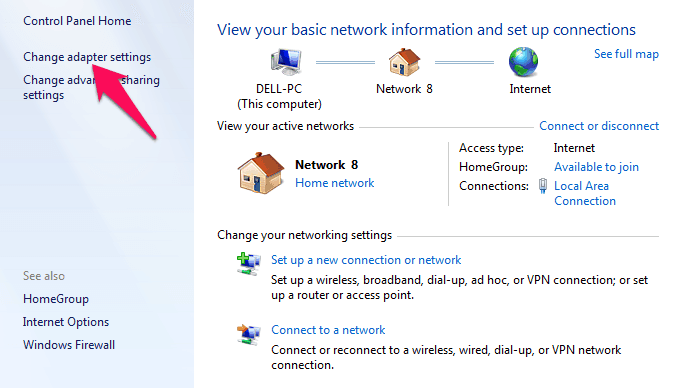
Step (1): You have to change DNS server manually. For changing the DNS server, open Control panel on your computer and then select Network and Internet. Once you have opened Network and Internet settings, you have to choose Network Sharing Center. Here you have to select Change Adapter settings.
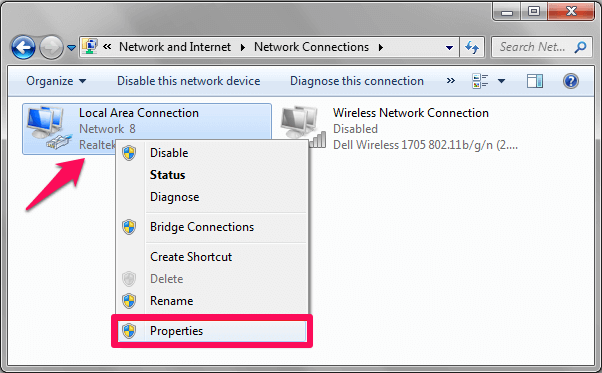
Step (2): You will find all the adapters which are installed on your computer. Now you have to select the adapter which you are using on your computer. Right click on the adapter and then select Properties.
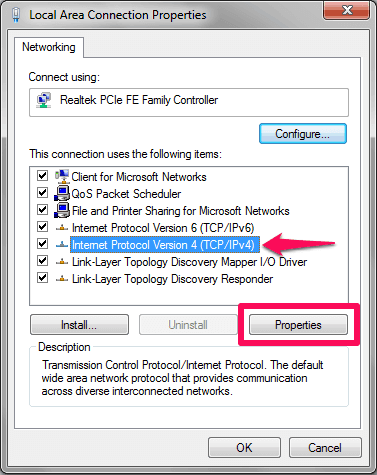
Step (3): You will see many options here. Select Internet Protocol Version 4 (TCP/IPv4) from here and then click on Properties option.
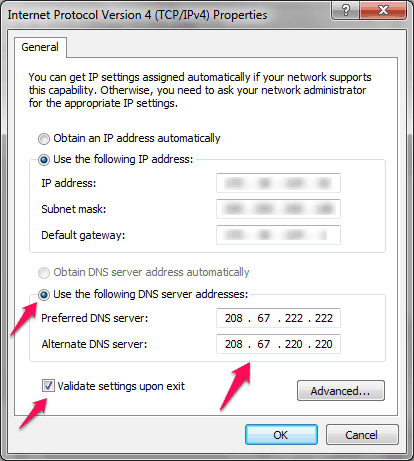
Step (4): Change the DNS server by selecting “Use the following DNs server addresses” option.
Step (5): Enter the below-mentioned DNS addresses in their respective fields:
Or, you can also use Google’s DNS address:
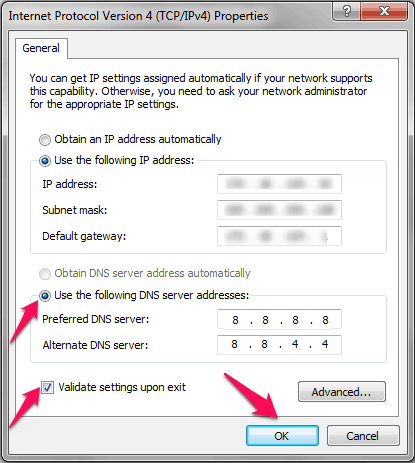
Step (6): Once you have entered the details, select Validate settings upon exit. Select OK and then click on exit button.
Once you have changed the settings in the adapter, now you need to make changes in the router configuration as well as it will help you to fix the DNS server isn’t responding problem.
Step (1): Download and install OpenDNS on your computer. You can download it from this link.
Step (2): Open command prompt on your computer and then enter IPCONFIG/ALL
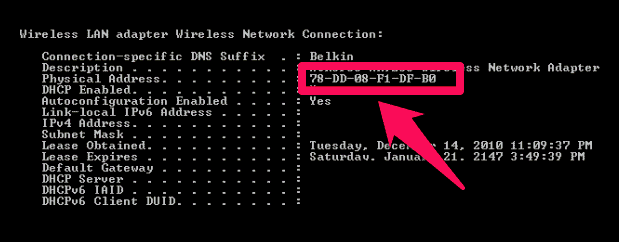
Step (3): Find the LAN or Local Area Adapter here. Now write down the Physical address which you see in the command prompt.
Step (4): Now, open Start menu and then enter CPL.
Step (5): Select the Network Adapter and right click on it. Now select Properties from the menu displayed.
Step (6): Select Configure and then open Advance tab and open Network address.
Step (7): From here you have to choose redial button Value. Here you have to enter the physical address which you have written down before from the command window.
For the example: If the Physical address of your network adapter is 78-DD-08-F1-DF-B0 then you have to remove the dashes and type it as 78DD08F1DFB0).
Step (8): Finally, select OK button and then choose Reboot the system.
Once you have done all the above-mentioned things, search for the drivers of the network adapter from the manufacturer’s website. This should fix the DNS server is not responding error. If your connection is blocked then you can disable the Network Firewall settings.
Method 2: Reset DNS settings to Fix DNS server not responding
You can also reset the DNS settings as it will help to fix DNS server isn’t responding issue very quickly. Here’s how to reset DNS settings in Windows system:
Step (1): First of all, open Run window on your computer by pressing Windows + R key. Enter cmd in the dialog box to open the command prompt window.
Step (2): Now to reset the DNS settings, you have to execute the commands which we have mentioned below:
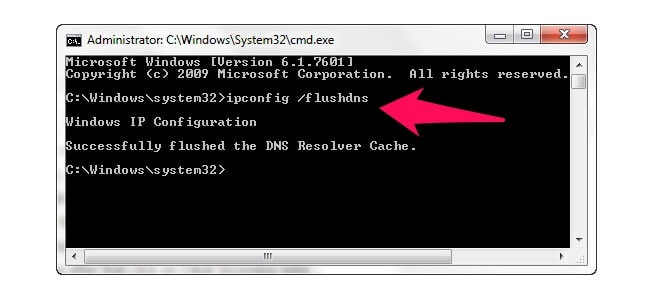
Once you have executed all these commands successfully, reboot your system and DNS server isn’t responding error should be resolved.
Method 3: Restart the Router
The above two methods should solve the DNS server is not responding error, however if you failed to fix the issue you can disconnect the Wi-Fi router and reboot it. Rebooting the router has helped a lot of people and it is really a quick fix. Make sure that you have switched off the router for at least 2 minutes before you turn it back on.
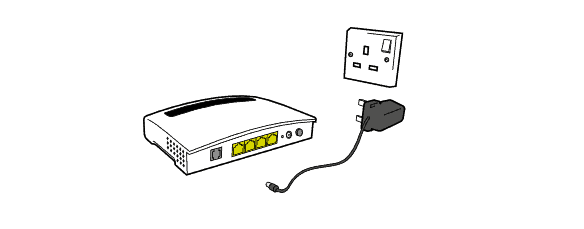
The 2-minute time interval will make sure that all the memory is erased along with the remaining charge. Provide the power supply to your router after 2 minutes and this should fix “The DNS server isn’t responding” in Windows 10 / 8 / 7 computer.
Method 4: Enter Safe Mode
If you are still experiencing the problem then you can enter the safe mode of your computer as it has proven as DNS server not responding fix. You might have installed a third party software which disabled the internet connection on your computer.
To enter Safe mode on your computer, simply power it off and hold the F8 key when it is booting. Once booted, try to connect with the internet. Learn: How to Open Windows 10 in Safe Mode [Quick ways]
Method 5: Disable All the Extra Internet Connections
If you are using a lot of Internet connections on your computer then also you can experience this error. Windows also install a lot of connections by default when you connect to a new network.
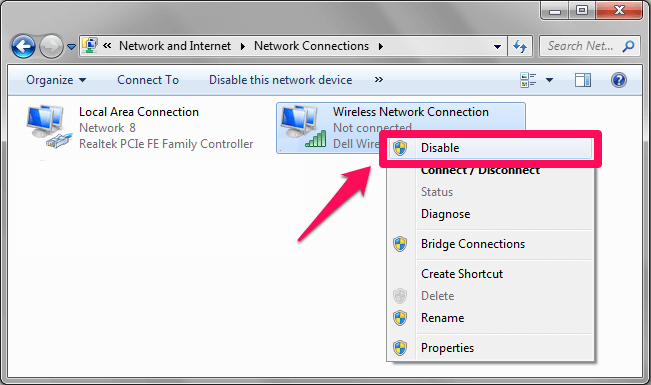
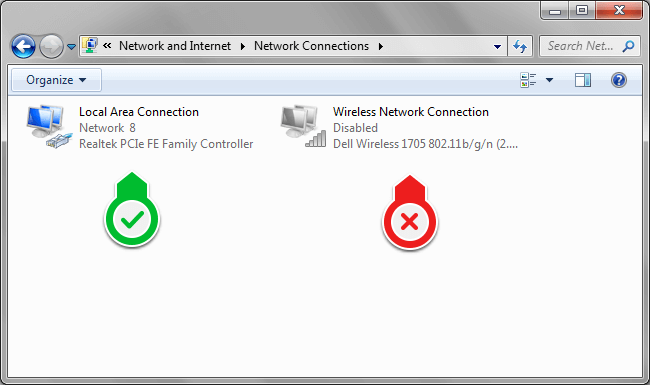
To uninstall all the extra connections which you are not using on your computer, you have to open Control Panel and then go to Network and Sharing. Select Change adapter settings option and then select the connection which you are not using. Right click on the extra connection and then choose Disable option.
Method 6: Troubleshoot Using a Software
If the above explained all methods failed for you then you can take help of a software to troubleshoot the DNS server is not responding problem.
Smart Dns Server Not Responding Fixer is a tool which specializes in fixing the Windows registry errors and all the DNS server issues. You can easily install the software called Smart Dns Server Not Responding Fixer Pro on your computer and start the Scan. Once the scan is completed, it will display all the problems which were identified in the scan and which need to be fixed.
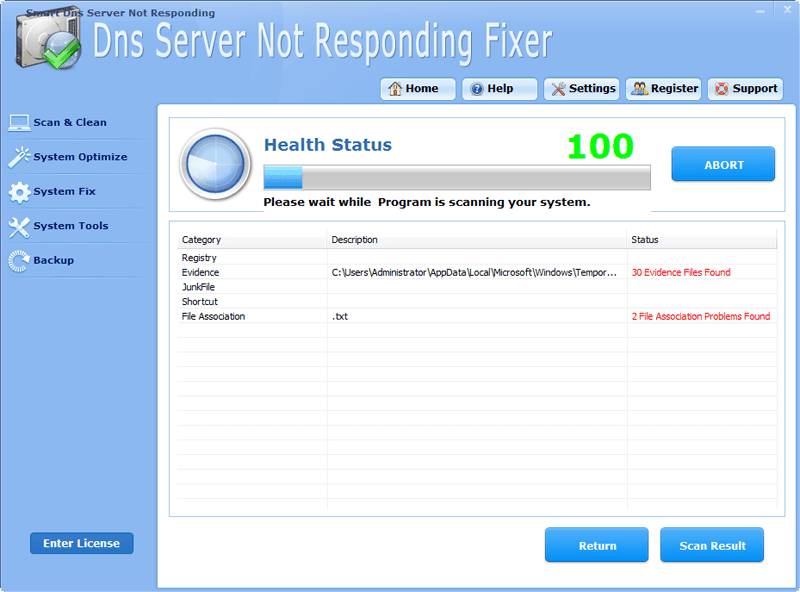
In order to fix the DNS server not responding issue, you can click on the Fix button which will resolve all the DNS errors which you are having on your computer.
You can perfectly use this software in Windows 10, 8, 8.1 and 7 operating system. To see what was scanned and what were the issues you can check the logs of the software.
Conclusion
So, these are the top 6 most helpful methods which make to our gu >how to fix The DNS server isn’t responding in Windows 10 / 8 / 7 ” and now you are able to connect to the internet.
This is not a really big issue but a very common one and the solution to this issue is also quite simple as you have already seen above. However, if you are not able to fix DNS server is not responding error with simple solutions then you have to opt the advanced methods.
Feel free to let us know using the comments section below – which method worked best for you as the DNS server not responding fix?
Updated: August 16, 2019
This article was co-authored by our trained team of editors and researchers who validated it for accuracy and comprehensiveness. wikiHow’s Content Management Team carefully monitors the work from our editorial staff to ensure that each article meets our high standards.
The wikiHow Tech Team also followed the article’s instructions and validated that they work. Learn more.

DNS server is a crucial component of the Internet. Unfortunately, few users reported DNS server is not responding error message on their Windows 10 PC, therefore today we’re going to show you how to fix this problem.
If you want to access any website on the Internet, you need to access the DNS server first. After DNS server receives your request, you’ll be directed to the desired website.
What to do if DNS server is not responding Windows 10? The quickest fix is to change the DNS server settings manually. Then disable your firewall, reset your router and test the connection again.
If the problem persists, use the additional troubleshooting methods listed below.
How to fix DNS server not responding error on Windows 10?
1. Change the DNS server manually
When you try to access a certain website, you’ll automatically connect to your ISP’s DNS server.
However, it can happen that your DNS server is not available. If that’s the case, you’ll see DNS server is not responding error message.
One way to fix this problem is to change your DNS server to OpenDNS or Google DNS. This is a pretty simple procedure, and you can perform it by following these steps:
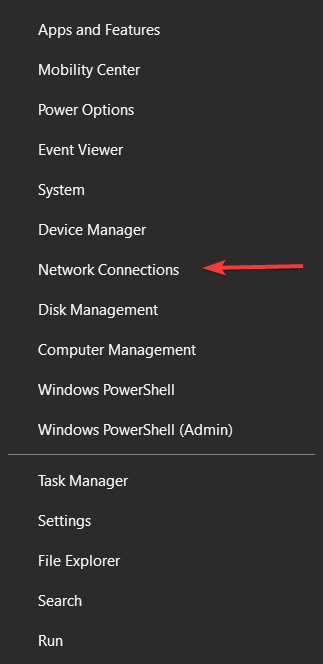
- Open Network Connections. You can do that by pressing Windows Key + X on your keyboard and choosing Network Connections option.

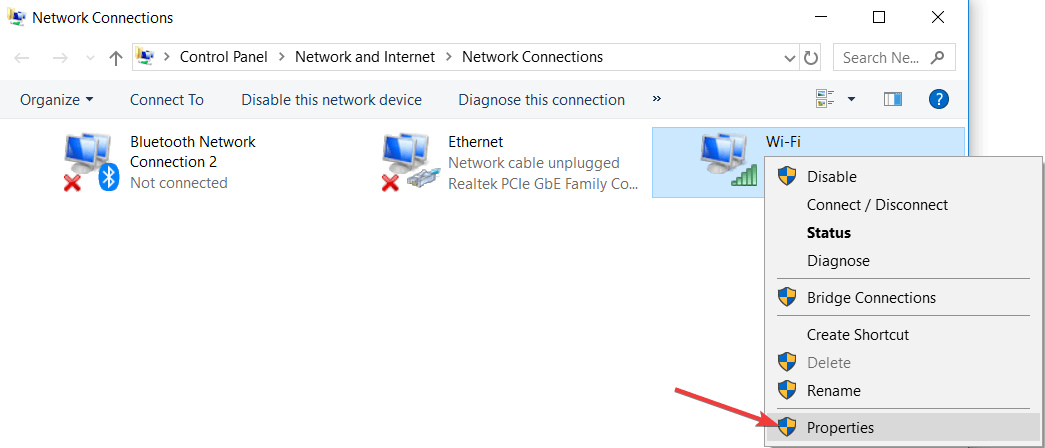
- Locate your network connection, right click it and choose Properties from the menu.
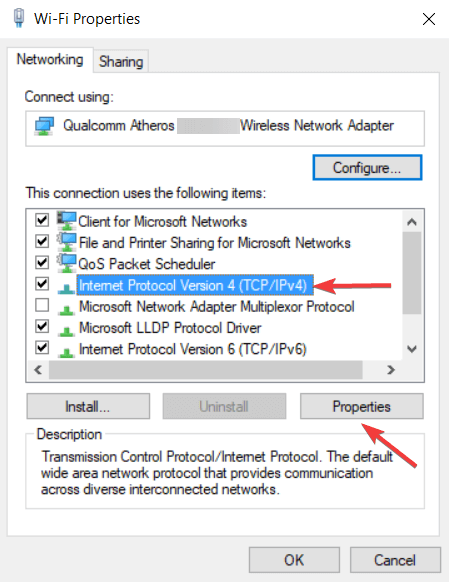
- When Properties window opens, select Internet Protocol Version 4 (TCP/IPv4) and click the Properties button.
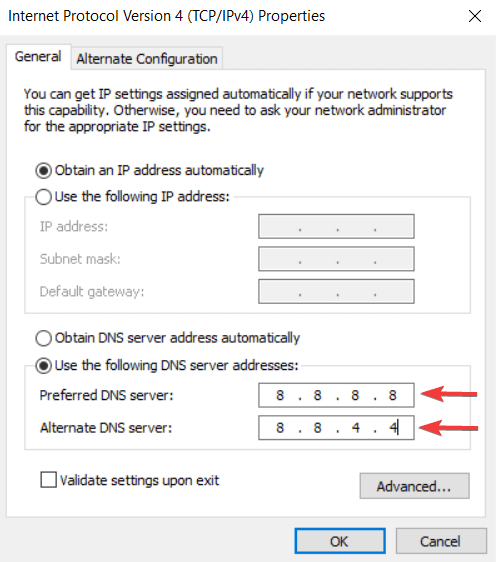
- Now select Use the following DNS server addresses option.
- As Preferred DNS server enter 8.8.8.8. As for Alternate DNS server, you need to enter 8.8.4.4. If you want, you can also use 208.67.222.222 as Preffered and 208.67.220.220 as Alternate DNS server.
- After you’re done, click OK to save changes.
- Optional: Disconnect from the Internet and connect back again
After changing the DNS server, check if the problem is resolved.
Keep in mind that changing your DNS server might make your Internet connection a bit slower depending on your location, so you might want to experiment with different servers.
2. Enter your MAC address manually
According to users, you can sometimes DNS failure simply by entering the MAC address of your network adapter manually.
This is a simple procedure, and in order to enter your MAC address, you need to find it first. To do that, follow these steps:
- Press Windows key + X and choose Command Prompt (Admin).
- When Command Prompt opens, enter ipconfig /all and press Enter.
- List of information will now appear. Locate Physical Address and write it down.
- Close Command Prompt.

Now that you know your MAC address, you need to configure your network connection. To do that, follow these steps:
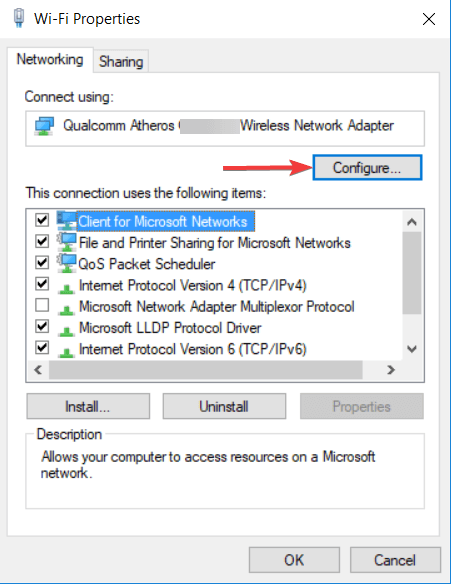
- Open Network Connections window. Locate your connection and open its properties.
- When Properties window opens, click on Configure.
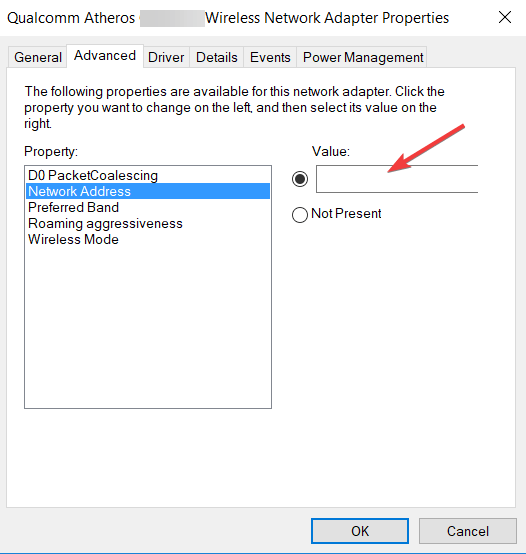
- Go to Advanced tab and select Network Address from the Property list.
- Now select Value and enter the MAC address that you got from Command Prompt. Be sure not to enter any dashes while entering your MAC address.
- Click OK to save changes.
Users report that this solution works best after switching to Google DNS or OpenDNS, so be sure to try it.
3. Install the latest drivers
Your network adapter relies on drivers in order to work properly, and if you have any problems with it, it might be due to your drivers.
To fix DNS server is not responding error on Windows 10 you need to visit your network adapter manufacturer’s website, download the latest drivers and install them on your PC.
If you can’t access Internet at all, it might be caused DNS server is unavailable, so download the drivers on a different device and install them on your PC.
Some users are also recommending to uninstall your network drivers before installing the new drivers. To do that, follow these steps:
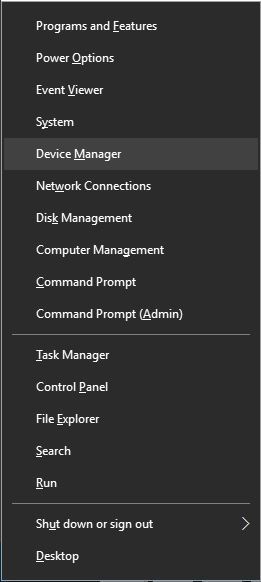
- Press Windows Key + X and choose Device Manager from the list.
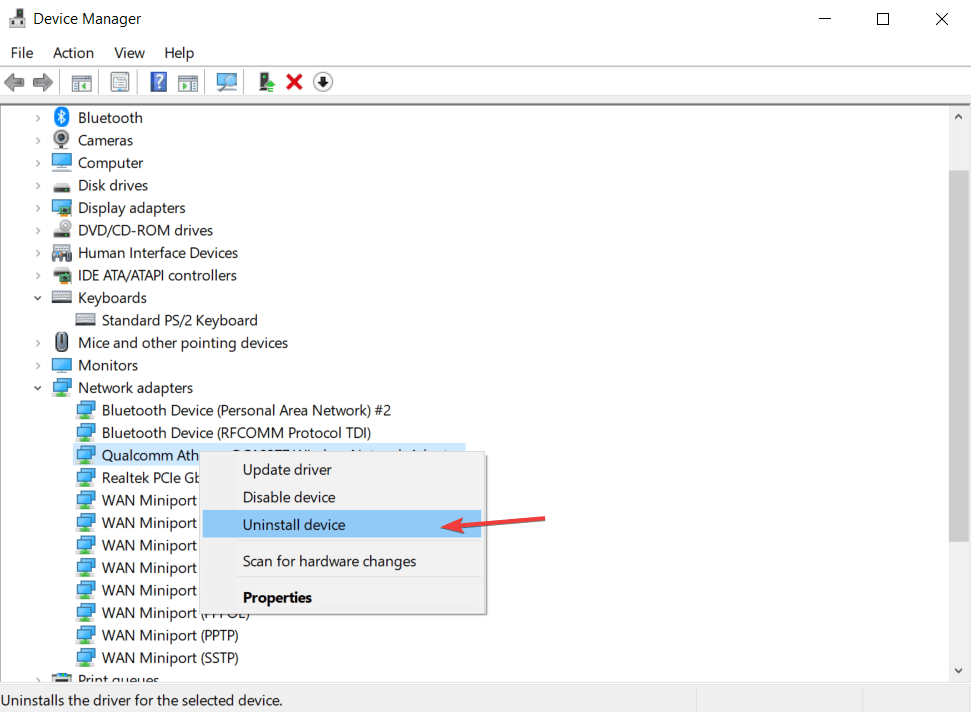
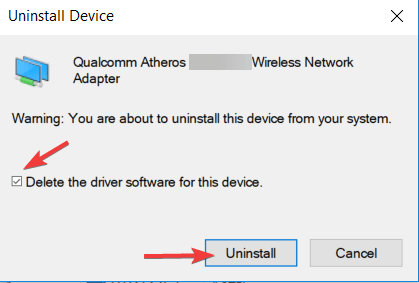
- When Device Manager opens, locate your network adapter, right click it and choose Uninstall.
- Confirmation dialog will now appear. If available, check Delete driver software for this device and click Uninstall.
- After you delete the driver, restart your PC.
- When your PC restarts, the default network driver will be installed. Check if the problem is resolved.
- If the issue still persists, install the latest drivers for your network device and check if that solves the issue.
Update drivers automatically
Downloading drivers manually can cause damage to your computer in case you downloaded the wrong version. We strongly suggest to do it automatically by using Tweakbit’s Driver Updater tool.
This tool is approved by Microsoft and Norton Antivirus. After several tests, our team concluded that this is the best automatized solution. Below you can find a quick guide how to do it.
- Download and install TweakBit Driver Updater
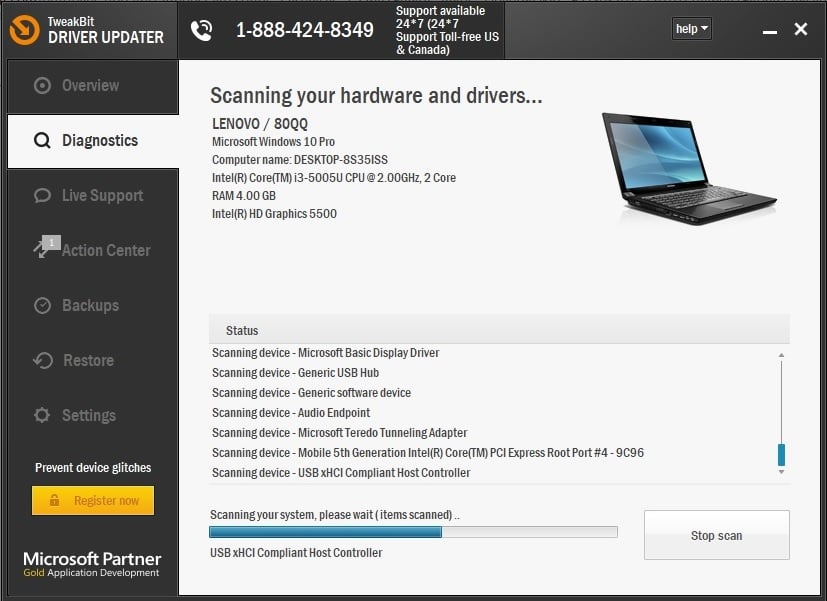
- Once installed, the program will start scanning your PC for outdated drivers automatically. Driver Updater will check your installed driver versions against its cloud database of the latest versions and recommend proper updates. All you need to do is wait for the scan to complete.
- Upon scan completion, you get a report on all problem drivers found on your PC. Review the list and see if you want to update each driver individually or all at once. To update one driver at a time, click the ‘Update driver’ link next to the driver name. Or simply click the ‘Update all’ button at the bottom to automatically install all recommended updates.
Note:Some drivers need to be installed in multiple steps so you will have to hit the ‘Update’ button several times until all of its components are installed.
 Once installed, the program will start scanning your PC for outdated drivers automatically. Driver Updater will check your installed driver versions against its cloud database of the latest versions and recommend proper updates. All you need to do is wait for the scan to complete.
 Upon scan completion, you get a report on all problem drivers found on your PC. Review the list and see if you want to update each driver individually or all at once. To update one driver at a time, click the ‘Update driver’ link next to the driver name. Or simply click the ‘Update all’ button at the bottom to automatically install all recommended updates.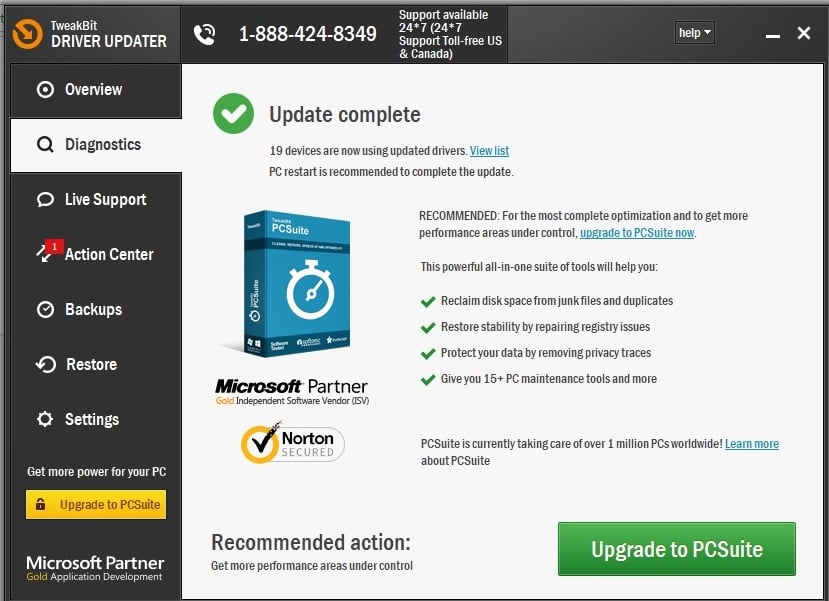
Disclaimer: some functions of this tool are not free.
4. Disable your antivirus and firewall

Antivirus and firewall are necessary if you want to protect your PC from malicious users, but sometimes your antivirus and firewall can interfere with your Internet connection.
To fix DNS server not responding message on Windows 10, try temporarily disabling your antivirus and firewall client.
Keep in mind that your PC will still be protected by Windows Defender even if you disable your antivirus, so there’s no need to worry about your safety.
If your antivirus or firewall client was causing this issue, be sure to change its configuration or switch to a different client.
Users reported that Bitdefender Total Security antivirus tool can sometimes cause this problem to appear. If you’re using Bitdefender, you need to go to Firewall settings and disable Block Internet connection sharing option.
After that, the problem should be resolved. Users reported that Avast can also cause this problem. To fix it, simply open Avast settings and disable Secure DNS option.
You can also try disabling firewall on your router. This is a bit advanced and potentially dangerous solution, so keep that in mind. By disabling your router’s firewall your PC will be completely vulnerable.
If you decide to do that, just disable your router’s firewall temporarily and check if that fixes the problem.
If the problem was your firewall, you need to turn it back on again and check your firewall configuration for the source of the problem.
To see how to disable your router’s firewall be sure to check its instruction manual.
5. Update your router’s firmware

Few users reported that DNS server not responding while using wireless network. However, you can fix that simply by updating your router’s firmware. We have to warn you that this is an advanced process, so you need to be extra cautious in order to avoid causing damage.
Before updating your router’s firmware be sure to back up its settings. To see how to properly update the firmware, we advise you to check your instruction manual.
6. Use netsh command

According to users, you can fix DNS failure simply by running few commands from Command Prompt. To do that, follow these steps:
- Open Command Prompt as administrator.
- When Command Prompt opens, enter:
- netsh int ip reset
- netsh winsock reset
- ipconfig /flushdns
- ipconfig /renew
- After all commands are executed, restart your computer.
By performing these commands you’ll reset your IP and clear the DNS cache, so be sure to try this method.
7. Restart your modem
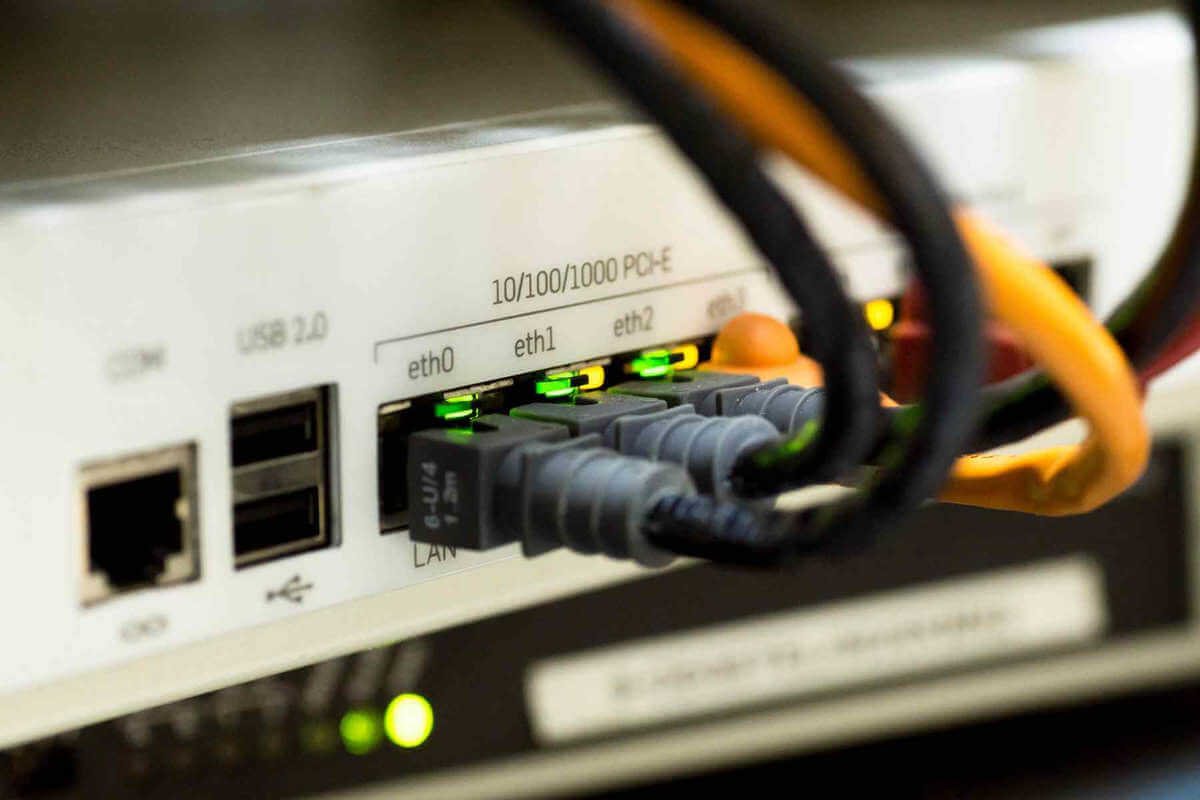
One way to fix DNS server not responding error on Windows 10 , is by restarting your modem. To do that, simply press the power button on your modem to turn it off.
Wait for 30 seconds and press the power button again to turn it on. Wait until the modem turns on completely and check if the problem still persists.
8. Start your PC in Safe Mode

Sometimes third-party applications such as antivirus or VPN tools can interfere with your Internet connection.
In order to fix DNS server not responding error on Windows 10, be sure to try accessing the Internet from Safe Mode.
If you’re not familiar, Safe Mode is a special mode in Windows that runs only with basic software and drivers. To enter Safe Mode on Windows 10, you need to follow these steps:
- Open the Start Menu and click the Power button. Hold down the Shift key on your keyboard and click Restart.
- You’ll see three options available. Choose Troubleshoot.
- Select Advanced options > Startup Settings and click the Restart button.
- When your PC restarts you’ll see a list of options available. Select Safe Mode with Networking by pressing F5 on the keyboard.
- Safe Mode will now start.
When Safe Mode starts, check if your network connection is working. If there are no problems with your Internet connection in Safe Mode it means that third-party software is interfering with your network connection.
To fix this issue, you need to find and remove the problematic application from your PC.
9. Disable Microsoft Virtual WiFi Miniport Adapter
If DNS server is not responding on WiFi connection, the problem might be caused by Microsoft Virtual WiFi Miniport Adapter. To fix this issue, you need to find and disable these adapters.
You can do that by following these steps:
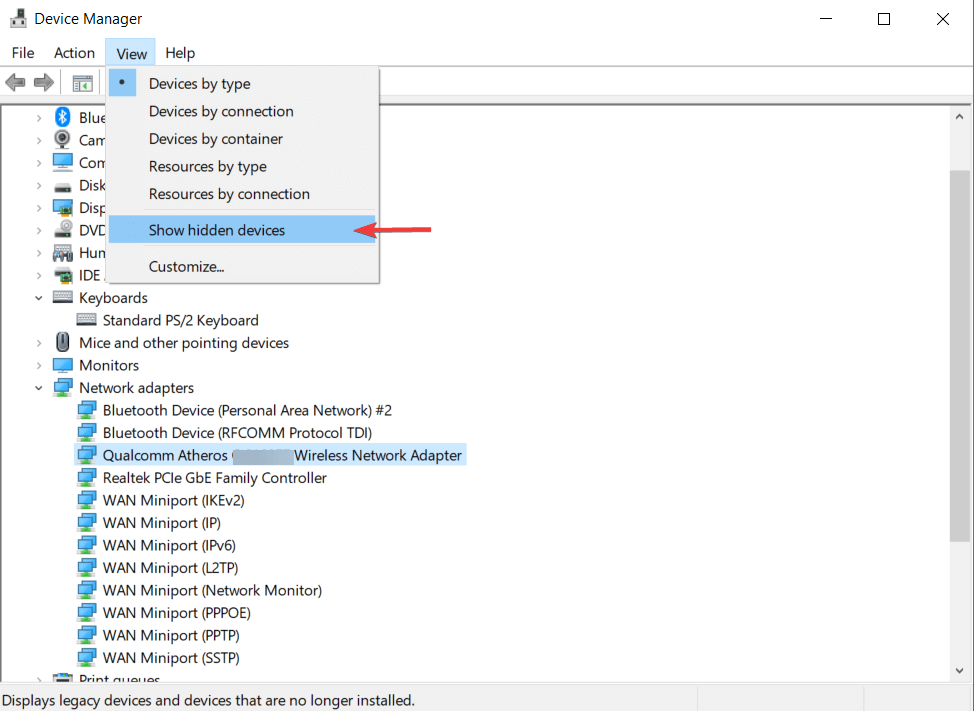
- Open Device Manager.
- When Device Manager opens, go to View and select Show hidden devices.
- Locate Microsoft Virtual WiFi Miniport Adapter, right click it and choose Disable. Repeat this step for all available Virtual Miniport Adapters.
- After you’re done, close Device Manager and check if the problem is resolved.
10. Disable Internet Protocol Version 6
There are two types of IP addresses, v4 and v6. If you are having DNS server is not responding error on your PC, you might be able to fix it by disabling Internet Protocol Version 6.
This is rather simple, and in order to do it you need to follow these steps:
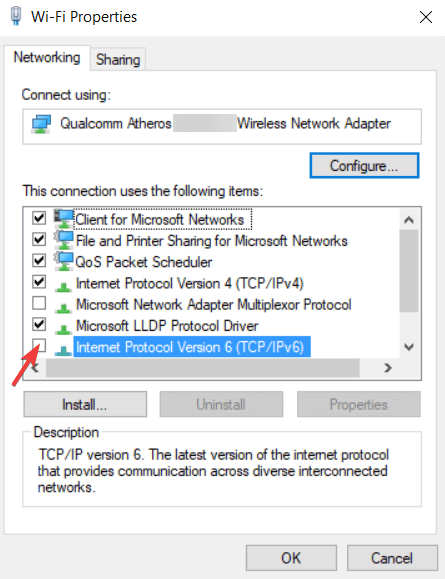
- Open Network Connections.
- Right click your connection and choose Properties.
- Now Locate Internet Protocol Version 6 (TCP/IPv6) and disable it.
- Click the OK button to save changes.
Disabling IPv6 won’t affect your computer in any negative way, but hopefully it should fix the problem with the DNS server.
11. Disable all additional connections
You might have multiple connections available on your PC, that can sometimes cause DNS server not responding while using WiFi connection problem.
To fix this issue, you need to disable those connections from Network Connections window.
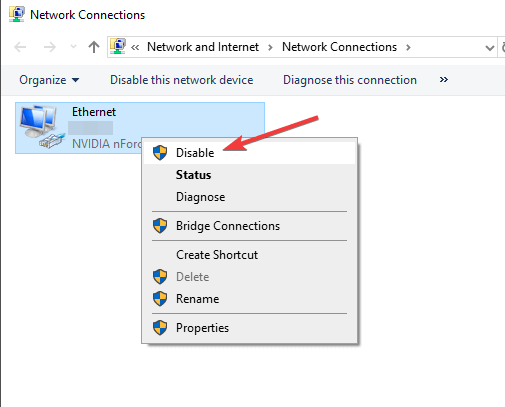
- Simply open Network Connections window and disable all connections except your active network connection.
- To do that, simply right click the connection that you want to disable and choose Disable from the menu.
12. Check for third-party applications
Some third-party applications can affect your DNS and cause this problem to appear. Users reported that their DNS changes automatically to certain address.
Apparently, the problem was caused by a third-party application called ColdTurkey.
After disabling or uninstalling the problematic application, the DNS server is not responding error was completely resolved.
Keep in mind that almost any network-related or security application can interfere with your DNS, so keep a close eye on all installed applications.
13. Change the DNS address on your router
According to users, you might be able to fix this problem by setting a different DNS address on your router. To do that, you need to access your router’s configuration page and look for DNS setting.
Change DNS server to Google DNS or OpenDNS and check if the problem is resolved. For detailed instructions on how to change your DNS, be sure to check your router’s instruction manual.
14. Reset your router
Your router configuration can sometimes cause DNS problems to appear. To fix DNS server not responding error on Windows 10 , you need to reset your router to default settings.
To do that, you need to open your router’s configuration page and select the Reset option.
If you want, you can also export your configuration so you don’t have to configure wireless networks again.
Another way to reset your router is to hold the reset button on it for few seconds. Both methods work the same, and you should use the one that you’re most comfortable with.
If you’re not sure how to reset your router, check your instruction manual for step by step instructions.
15. Turn off peer-to-peer update feature
Windows 10 comes with a great feature that allows you to download Windows updates using peer-to-peer technology.
Basically, this features allows you to download Windows updates directly from other users in your area.
This is a useful and innovative feature, but it seems that this feature can sometimes cause DNS failure. One potential solution for DNS problems is to disable this feature.
To do that, follow these steps:
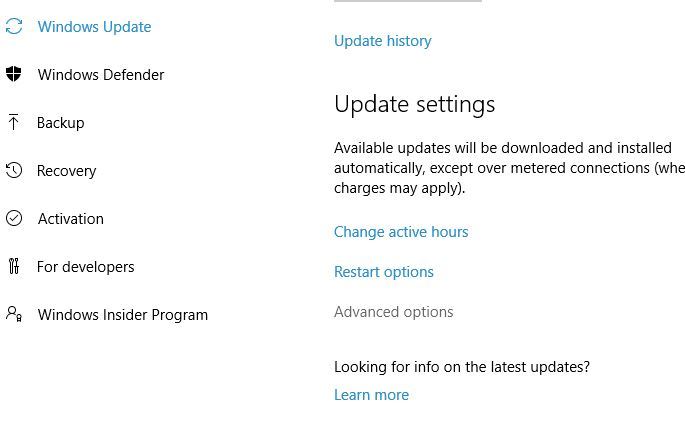
- Open Settings app by pressing Windows Key + I.
- Navigate to Update & security section and click on Advanced options.
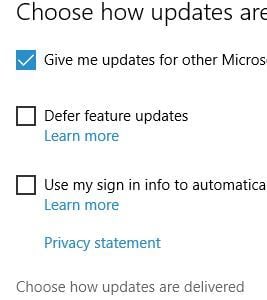
- Click on Choose how updates are delivered.
- Make sure that Updates from more than one place is set to Off.
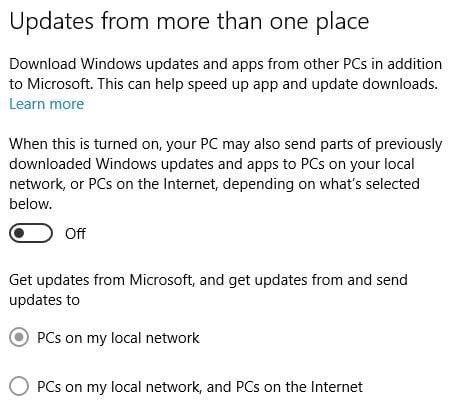
After turning this feature off, check if the problem with DNS server is resolved.
16. Wait for your ISP to fix the problem
Sometimes DNS server is not responding error can be caused by your ISP. Your ISP might be having some problems, so you might have to wait for a few hours while your ISP resolves technical difficulties.
DNS server is not responding error will prevent you from accessing the Internet, but you should be able to fix it by using one of our solutions.
READ ALSO:
Editor’s Note: This post was originally published in November 2016 and has been since updated for freshness, and accuracy.


