
The CORSAIR TX-M Series™ power supplies provide industrial build quality, 80 PLUS Gold efficiency, extremely tight voltages and a semi-modular cable set.


Содержание
TX-M Series™ TX550M — 550 Watt 80 Plus® Gold Certified PSU
You’ll save $00.00!
The CORSAIR TX-M Series™ power supplies provide industrial build quality, 80 PLUS Gold efficiency, extremely tight voltages and a semi-modular cable set.
RETAILERS
TX Series semi-modular power supplies are ideal for basic desktop systems where low energy use, low noise, and simple installation are essential. All of the capacitors are 105°C rated, Japanese brand, to ensure solid power delivery and long term reliability. 80 PLUS Gold efficiency reduces operating cost and excess heat. Flat, sleeved black modular cables with clearly-marked connectors make installation fast and straightforward, with good-looking results.


The super-efficient operation of the TX Series semi-modular results in lower energy use and lower operating costs. Since it generates less heat, the fan doesn’t need to work as hard, and you’ll enjoy near silent operation.
The flat, sleeved black cables are semi-modular, so you’ll only use the cables you need and you’ll get great-looking results. The clearly-marked connectors make installation fast and straightforward.


Every CORSAIR power supply is designed by our California engineering team and built to our exact specifications. The same care that goes into the design and testing of our renowned high-power enthusiast power supplies also goes into the TX-M Series semi-modular, because you need confidence and reliability regardless of your build budget.
COMPATIBILITY
- ATX12V v2.4 and EPS 2.92 standards
DOCUMENTATION
Understanding the Corsair AXi Series Digital Power Supplies
Replacing commonly used ICs with a digital signal processor in the Corsair AXi Series PSUs has many benefits. Today, I’m going to explain the functions of the components that are replaced within the Corsair Digital power supplies and how these changes benefit the end user.

The parts of the Corsair AXi Digital Power Supply that makes them unique when compared to other desktop power supplies is the absence of a PFC/PWM controller IC (integrated circuit) on the power supply’s primary side and a supervisor IC on the power supply’s secondary side. Both of these parts have been replaced with DSP, which stands for "Digital Signal Processor".
AXi PSUs still use what’s called a "resonant mode" topology like a lot of modern day super-efficient power supplies, but typically in other resonant mode PSUs a PWM controller IC changes the power supply’s switching frequency based on an analog signal derived from the load measured at the transformer. This makes the power supply more efficient at a wider range of loads compared to other power supply topologies, but doing this alone can affect ripple and noise and voltage regulation.

The resonant mode controller, shown above, is just about the only IC you’ll find in an AXi power supply that you may also see in other high end power supplies.
The supervisor IC is the heart of the power supply’s safety functions. Functions like OCP (over current protection, which is protection from any one output drawing too much current), OPP (over-power protection, which prevents overloading), OVP (over-voltage protection, which measures if voltage goes too high), UVP (under-voltage protection), and SCP (short circuit protection). Temperatures are also measured within the power supply and this is reported to the IC’s OTP (over-temperature protection). If any value programmed into the IC is exceeded, the IC is instructed to shut down the power supply.

Above is a supervisor IC found in a Corsair GS800 power supply.
In an effort to improve voltage regulation (drops in voltage as loads increase), the information concerning the power supply’s output voltage is sent back to the PWM controller via an analog signal. This information moves relatively slow when compared to the ever-varying loads of your typical PC, so voltage regulation is still not as good as it can be.

Above is the PWM/PFC controller from a Corsair GS800 power supply.
AXi power supplies improve on this analog system by using the DSP. Like a supervisor IC, the DSP measures all of the pertinent information on the secondary side, as well as taking the same measurements on the primary side as your typical PFC/PWM controller IC. This information is also analyzed by the DSP’s microprocessor and adjustments are made to the different components of the power supply in an effort to improve efficiency while maintaining very tight voltage regulation and minimizing ripple and noise. Because the signals are digital instead of analog and an inherently homogeneous DSP system is used to analyze the information as opposed to multiple ICs, adjustments can be made much faster than can be made with the typical set of ICs found in other desktop power supplies. And since the DSP is analyzing all of the same outputs (and then some!), the DSP still has the ability to act as a supervisor IC and shut down the power supply if any values exceed what is considered "safe" for the power supply or your computer.

Here is an AX860i removed from the housing. This one PCB has all of the chips that are part of the DSP system.
Let’s zoom in on some of the chips on this PCB. Shall we?

Above is a picture of the Freescale Digital Signal Controller found in the AXi series of power supplies. This chip handles what goes on on the primary side of the power supply.
This guy is responsible for the PFC (power factor correction) control, the PMW (pulse width modulation) control, monitoring of the AC input’s voltage, current and wattage and logical on/off control, like shutting down for inrush, brownouts, etc.

Above we see two more ICs found inside an AXi series power supply. The chip on the bottom is the main MCU, or "MCU I". The chip on the top is a USB MCU, or "MCU II". These guys handle what goes on on the secondary side of the power supply.
The MCU I does what we call "housekeeping". It has a lot of the same functions as a supervisor IC in an analog controlled PSU. Things like OCP, OPP, OVP, etc. are all monitored by this chip. This chip also handles the PMBus (power management bus) and thermal monitoring and fan control. The MCU I also monitors the power on (soft on/off) and power good signals coming from the motherboard. On top of all of this, the MCU I also monitors the DC output for voltage drop, ripple and noise and communicates back to the DSP to address any issues that may come up.
The MCU II is the chip that allows the user to turn on/off the single/multiple +12V rail capability of an AXi PSU via the Corsair Link software. The self test function is also controlled by this chip.
Since the DSP accumulates all of this information about the power supply, and does so in real time, we can deliver it to the end user via our Corsair Link software. Power supplies have attempted to deliver similar information about the power supply to the end user in the past; either via software or displayed on a 5.25" bay LCD. But since the information about the power supply in these older units was accumulated via the PFC/PWM controller and supervisor IC, the information had to be converted to a digital signal before being displayed. This adds a good deal of cost and prevents the information from being delivered as close to real time as possible.

Using Corsair Link, we can monitor everything from AC input voltage, output wattage. even the current being delivered to each graphics card’s PCIe controller! Above you can see I’ve enabled OCP on each modular connector (essentially making the AXi a multiple +12V rail power supply) and turned all of the limits down to 20A.
We can also keep track of the temperature inside the power supply and how fast the fan is spinning:

All in all, AXi Digital Power Supplies are so much more than your average desktop PSU on so many levels. By utilizing a DSP, Corsair offers improved efficiency while maintaining stable voltage output and minimizing unwanted ripple and noise. And because all of this information is maintained in a digital format, and output to the Corsair Link software interface is practically seamless!
Using Link with a Corsair AXi Digital Power Supply
The Corsair AXi Series PSUs have a lot of premium features. They use a digital signal processor for better performance, they’re fully modular, and have a zero RPM fan mode at low loads. But one of the coolest things about the AXi power supplies, is their compatibility with the new Corsair Link software. Today, we take a look at the Corsair Link 2 software, or just "Link" for short, and more specifically how it gives you the ability to monitor AC input, DC output, the temperature and the fan speed of an AXi power supply.
The first thing I want to do is open up the "Graph" tab and set what I want to monitor in the "Config Panel" of this tab.

Above, you can see that I’ve checked boxes asking to have my two graphics cards’ temperatures and fans graphed, as well as my CPU’s temperature, the temperature of my AX860i power supply, as well as the AX860i’s fan speed. I’m also monitoring the temperature of the coolant in the Hydro Series H100 that is cooling the CPU and the RPMs of the two fans cooling the H100’s radiator.

While the system is idle, we can see that temperatures are relatively low. The AX860i is just barely over room temperature and therefore, the fan is not spinning.

Over on the "Power" tab, we see that the AX860i is only producing 107.3W as I sit here watching the Link software. It’s pulling 117.8W from the wall, so our efficiency is 91%.
On this tab, we can also monitor our voltages, including the voltage of our AC mains, as well as current for each of our +12V outputs.
There are also check boxes that allow you to turn OCP on for the 8-pin +12V outputs (labeled "PCIe") on the power supply. OCP stands for "over current protection" and will shut down the power supply if too much current is delivered on any of these outputs.
Finally, we see the AX860i’s temperature and the fan RPM on this tab. This is the same information we saw on the "Graph" tab, but in a different format. The fan is still not spinning because the temperatures are still low, but if we wanted to increase the airflow within our chassis just a bit, we can manually turn the fan speed up.
We start on the "System" tab.

On this tab, we can see everything that Corsair Link 2 monitors, but if we click on the "AX860i Fan" icon on the left, a configuration panel opens up on the right. By default, we can see the fan mode is set to "quiet" which means the fan isn’t going to spin at low loads. Changing this is easy.

The lowest setting is 40%, which equates to about 784 RPM. I can keep it like this and still not hear the fan. And the fan will still ramp up even faster automatically if needed. Let’s turn it up even more to find out where I can start hearing the fan.

At 76%, the fan is spinning 1508 RPM. I can definitely hear that now. Well, that’s enough of that. Let’s put the PSU fan back into "quiet" mode, fire up Prime95 and Furmark and see what kind of power we produce and let the fan spin up all on its own.

Almost immediately, the temperatures of the CPU and graphics cards increase. Under this load, we start to see the power supply fan ramp up as well.

After some time under load, we see our temperatures level out, an increase in the graphics cards’ fan’s RPMs and the PSU’s fan leveling off just over 500 RPM.

When we switch back over to the "Power" tab, we can see that our load has increased to 473.4W. We’re now pulling 502.9W from the wall and our efficiency is increased to 94%. We can see that the amperage delivered on all of our +12V connectors has increased, the AX860i’s temperature has increased very slightly, from 26.5 to 28.8°C, and the fan is now spinning at 556 RPM.

Of course, when you’re gaming you’re probably not going to be able to watch your load, temperatures and fan speeds while you’re playing. For this reason, Corsair Link allows you to log whatever information you’d like to keep track of in a CSV file. Simply check the boxes of the components you want to monitor, browse to where you want to save the file and give the file a name and click "start logging".
Блоки питания CORSAIR TX-M Series™ отличаются качеством сборки промышленного уровня, эффективностью 80 PLUS Gold, чрезвычайно точной регулировкой напряжения и набором полумодульных кабелей.
Полумодульные блоки питания TX Series идеально подходят для настольных ПК базового уровня, где решающую роль играют низкий уровень шума, минимальное энергопотребление и максимальная простота установки. Все конденсаторы японского производства рассчитаны на температуру 105 °C и обеспечивают бесперебойную подачу питания и долговременную надежность. Эффективность, подтвержденная сертификацией 80 PLUS Gold, позволяет сократить эксплуатационные расходы и снизить тепловыделение. Плоские модульные кабели с черной оплеткой и четко обозначенными разъемами упрощают сборку системы и обеспечивают потрясающий внешний вид.


Благодаря высочайшей эффективности полумодульных блоков питания TX Series обеспечивается значительное снижение энергопотребления и эксплуатационных расходов. Меньшая теплоотдача позволяет уменьшить нагрузку на вентилятор, что позволяет снизить уровень шума.
Плоские кабели в черной оплетке имеют полумодульную конструкцию, что позволяет использовать только необходимые кабели и улучшает внешний вид системы. Четкая маркировка разъемов значительно упрощает и ускоряет процесс установки.


Каждый блок питания CORSAIR разработан проектной группой в Калифорнии и создан в точном соответствии с заявленными характеристиками. Пристальное внимание, которое уделяется разработке и проверке наших легендарных высокомощных источников питания, также уделяется и источникам питания TX-M Series, поскольку стабильность и надежность функционирования системы важны независимо от ее стоимости.
COMPATIBILITY
- ATX12V v2.4 and EPS 2.92 standards
ДОКУМЕНТАЦИЯ
Understanding the Corsair AXi Series Digital Power Supplies
Replacing commonly used ICs with a digital signal processor in the Corsair AXi Series PSUs has many benefits. Today, I’m going to explain the functions of the components that are replaced within the Corsair Digital power supplies and how these changes benefit the end user.
The parts of the Corsair AXi Digital Power Supply that makes them unique when compared to other desktop power supplies is the absence of a PFC/PWM controller IC (integrated circuit) on the power supply’s primary side and a supervisor IC on the power supply’s secondary side. Both of these parts have been replaced with DSP, which stands for "Digital Signal Processor".
AXi PSUs still use what’s called a "resonant mode" topology like a lot of modern day super-efficient power supplies, but typically in other resonant mode PSUs a PWM controller IC changes the power supply’s switching frequency based on an analog signal derived from the load measured at the transformer. This makes the power supply more efficient at a wider range of loads compared to other power supply topologies, but doing this alone can affect ripple and noise and voltage regulation.
The resonant mode controller, shown above, is just about the only IC you’ll find in an AXi power supply that you may also see in other high end power supplies.
The supervisor IC is the heart of the power supply’s safety functions. Functions like OCP (over current protection, which is protection from any one output drawing too much current), OPP (over-power protection, which prevents overloading), OVP (over-voltage protection, which measures if voltage goes too high), UVP (under-voltage protection), and SCP (short circuit protection). Temperatures are also measured within the power supply and this is reported to the IC’s OTP (over-temperature protection). If any value programmed into the IC is exceeded, the IC is instructed to shut down the power supply.
Above is a supervisor IC found in a Corsair GS800 power supply.
In an effort to improve voltage regulation (drops in voltage as loads increase), the information concerning the power supply’s output voltage is sent back to the PWM controller via an analog signal. This information moves relatively slow when compared to the ever-varying loads of your typical PC, so voltage regulation is still not as good as it can be.
Above is the PWM/PFC controller from a Corsair GS800 power supply.
AXi power supplies improve on this analog system by using the DSP. Like a supervisor IC, the DSP measures all of the pertinent information on the secondary side, as well as taking the same measurements on the primary side as your typical PFC/PWM controller IC. This information is also analyzed by the DSP’s microprocessor and adjustments are made to the different components of the power supply in an effort to improve efficiency while maintaining very tight voltage regulation and minimizing ripple and noise. Because the signals are digital instead of analog and an inherently homogeneous DSP system is used to analyze the information as opposed to multiple ICs, adjustments can be made much faster than can be made with the typical set of ICs found in other desktop power supplies. And since the DSP is analyzing all of the same outputs (and then some!), the DSP still has the ability to act as a supervisor IC and shut down the power supply if any values exceed what is considered "safe" for the power supply or your computer.
Here is an AX860i removed from the housing. This one PCB has all of the chips that are part of the DSP system.
Let’s zoom in on some of the chips on this PCB. Shall we?
Above is a picture of the Freescale Digital Signal Controller found in the AXi series of power supplies. This chip handles what goes on on the primary side of the power supply.
This guy is responsible for the PFC (power factor correction) control, the PMW (pulse width modulation) control, monitoring of the AC input’s voltage, current and wattage and logical on/off control, like shutting down for inrush, brownouts, etc.
Above we see two more ICs found inside an AXi series power supply. The chip on the bottom is the main MCU, or "MCU I". The chip on the top is a USB MCU, or "MCU II". These guys handle what goes on on the secondary side of the power supply.
The MCU I does what we call "housekeeping". It has a lot of the same functions as a supervisor IC in an analog controlled PSU. Things like OCP, OPP, OVP, etc. are all monitored by this chip. This chip also handles the PMBus (power management bus) and thermal monitoring and fan control. The MCU I also monitors the power on (soft on/off) and power good signals coming from the motherboard. On top of all of this, the MCU I also monitors the DC output for voltage drop, ripple and noise and communicates back to the DSP to address any issues that may come up.
The MCU II is the chip that allows the user to turn on/off the single/multiple +12V rail capability of an AXi PSU via the Corsair Link software. The self test function is also controlled by this chip.
Since the DSP accumulates all of this information about the power supply, and does so in real time, we can deliver it to the end user via our Corsair Link software. Power supplies have attempted to deliver similar information about the power supply to the end user in the past; either via software or displayed on a 5.25" bay LCD. But since the information about the power supply in these older units was accumulated via the PFC/PWM controller and supervisor IC, the information had to be converted to a digital signal before being displayed. This adds a good deal of cost and prevents the information from being delivered as close to real time as possible.
Using Corsair Link, we can monitor everything from AC input voltage, output wattage. even the current being delivered to each graphics card’s PCIe controller! Above you can see I’ve enabled OCP on each modular connector (essentially making the AXi a multiple +12V rail power supply) and turned all of the limits down to 20A.
We can also keep track of the temperature inside the power supply and how fast the fan is spinning:
All in all, AXi Digital Power Supplies are so much more than your average desktop PSU on so many levels. By utilizing a DSP, Corsair offers improved efficiency while maintaining stable voltage output and minimizing unwanted ripple and noise. And because all of this information is maintained in a digital format, and output to the Corsair Link software interface is practically seamless!
Using Link with a Corsair AXi Digital Power Supply
The Corsair AXi Series PSUs have a lot of premium features. They use a digital signal processor for better performance, they’re fully modular, and have a zero RPM fan mode at low loads. But one of the coolest things about the AXi power supplies, is their compatibility with the new Corsair Link software. Today, we take a look at the Corsair Link 2 software, or just "Link" for short, and more specifically how it gives you the ability to monitor AC input, DC output, the temperature and the fan speed of an AXi power supply.
The first thing I want to do is open up the "Graph" tab and set what I want to monitor in the "Config Panel" of this tab.
Above, you can see that I’ve checked boxes asking to have my two graphics cards’ temperatures and fans graphed, as well as my CPU’s temperature, the temperature of my AX860i power supply, as well as the AX860i’s fan speed. I’m also monitoring the temperature of the coolant in the Hydro Series H100 that is cooling the CPU and the RPMs of the two fans cooling the H100’s radiator.
While the system is idle, we can see that temperatures are relatively low. The AX860i is just barely over room temperature and therefore, the fan is not spinning.
Over on the "Power" tab, we see that the AX860i is only producing 107.3W as I sit here watching the Link software. It’s pulling 117.8W from the wall, so our efficiency is 91%.
On this tab, we can also monitor our voltages, including the voltage of our AC mains, as well as current for each of our +12V outputs.
There are also check boxes that allow you to turn OCP on for the 8-pin +12V outputs (labeled "PCIe") on the power supply. OCP stands for "over current protection" and will shut down the power supply if too much current is delivered on any of these outputs.
Finally, we see the AX860i’s temperature and the fan RPM on this tab. This is the same information we saw on the "Graph" tab, but in a different format. The fan is still not spinning because the temperatures are still low, but if we wanted to increase the airflow within our chassis just a bit, we can manually turn the fan speed up.
We start on the "System" tab.
On this tab, we can see everything that Corsair Link 2 monitors, but if we click on the "AX860i Fan" icon on the left, a configuration panel opens up on the right. By default, we can see the fan mode is set to "quiet" which means the fan isn’t going to spin at low loads. Changing this is easy.
The lowest setting is 40%, which equates to about 784 RPM. I can keep it like this and still not hear the fan. And the fan will still ramp up even faster automatically if needed. Let’s turn it up even more to find out where I can start hearing the fan.
At 76%, the fan is spinning 1508 RPM. I can definitely hear that now. Well, that’s enough of that. Let’s put the PSU fan back into "quiet" mode, fire up Prime95 and Furmark and see what kind of power we produce and let the fan spin up all on its own.
Almost immediately, the temperatures of the CPU and graphics cards increase. Under this load, we start to see the power supply fan ramp up as well.
After some time under load, we see our temperatures level out, an increase in the graphics cards’ fan’s RPMs and the PSU’s fan leveling off just over 500 RPM.
When we switch back over to the "Power" tab, we can see that our load has increased to 473.4W. We’re now pulling 502.9W from the wall and our efficiency is increased to 94%. We can see that the amperage delivered on all of our +12V connectors has increased, the AX860i’s temperature has increased very slightly, from 26.5 to 28.8°C, and the fan is now spinning at 556 RPM.
Of course, when you’re gaming you’re probably not going to be able to watch your load, temperatures and fan speeds while you’re playing. For this reason, Corsair Link allows you to log whatever information you’d like to keep track of in a CSV file. Simply check the boxes of the components you want to monitor, browse to where you want to save the file and give the file a name and click "start logging".
Ваша заказ успешно отправлен
OCLab.ru — Лаборатория оверклокинга, созданная российскими оверклокерами с мировым именем.
Обзор и тест блока питания Corsair TX550M
Рынок комплектующих развивается бурными темпами, каждый год производители представляют новые продукты, с улучшенными характеристиками, как производительности, так и энергопотребления. Современные технологические процессы производства процессоров и видеокарт, хоть и медленно, но снижают потребление комплектующих.
Если раньше при сборке топового компьютера вам нужны были блоки питания от 750 до 1000 Вт, то сегодня минимальный порог снизился. Игровые компьютеры среднего уровня можно собрать с БП от 450 до 500 Вт, а топовым машинам уже хватает 550 – 700 Вт. Конечно же, есть машины с несколькими видеокартами, которым все также будут требоваться киловаттные блоки, но это уже удел энтузиастов.
Уменьшение габаритов коснулось непосредственно и самих блоков питания. Сейчас можно встретить компактные модели с мощностью 550 Вт, а 450 Вт модели и вовсе стали “малышами”.
Corsair, как один из лидеров производства блоков питания, находится на острие прогресса, с завидным постоянством представляя новые модели БП.
Сегодня мы будем знакомиться, как раз с такой новинкой, блоком питания Corsair TX550M. Он принадлежит к серии TX-M и может похвастаться компактными размерами, а также качественными компонентами.
По данным Яндекс.Маркета блок питания Corsair TX550M можно приобрести за 5 500 – 6 000 руб. (Стоимость может меняться в зависимости от региона и даты приобретения).
Технические характеристики Corsair TX550M.
| Производитель | Corsair |
| Модель | TX550M |
| Сертификат качества | 80 Plus Gold |
| Модульность | Частично модульный |
| Номинальная температура | 50°C |
| Защита | UVP (защита от понижения напряжения) OVP (защита от превышения напряжения) OCP (защита от превышения тока) OPP (защита от превышения мощности) OTP (защита от превышения температуры) SCP (защита от короткого замыкания) |
| Охлаждение | 120 мм вентилятор (NR120L) |
| Полупассивная работа | Да |
| Размеры | 150 x 86 x 140 мм |
| Вес | 1,7 кг |
| Стандартизация | ATX12V v2.4, EPS 2.92 |
| Гарантия | 7 лет |
Упаковка и комплектация Corsair TX550M.
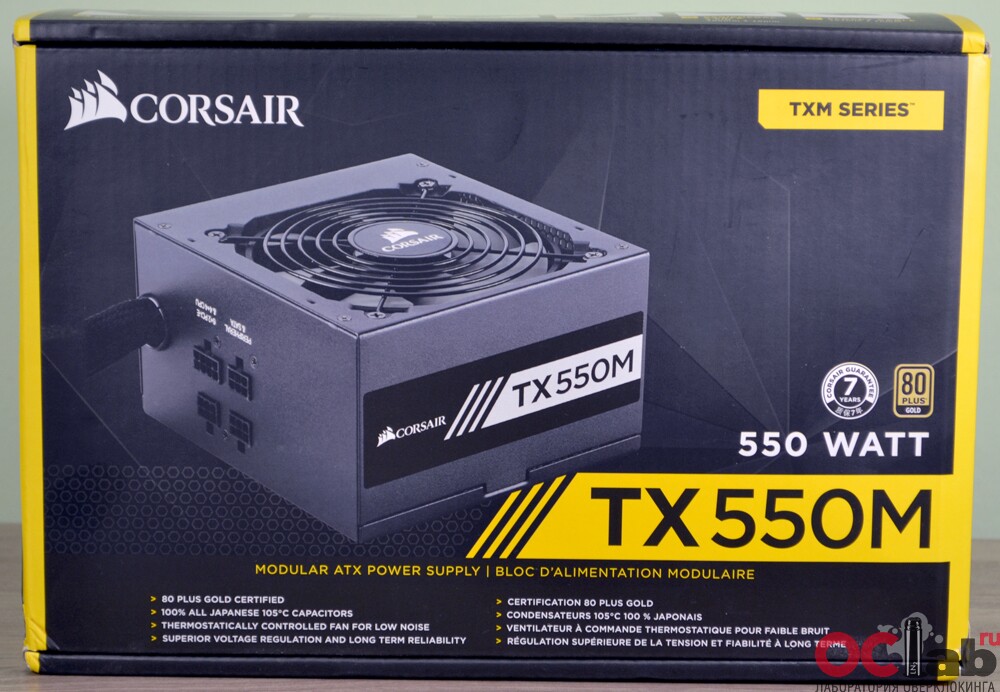

Блок питания Corsair TX550M поставляется в картонной коробке средних размеров, она оформлена в черно-желтом фирменном стиле компании Corsair. Спереди нас встречает изображение самого БП, а с противоположной стороны графики эффективности работы, и подробные технические характеристики.
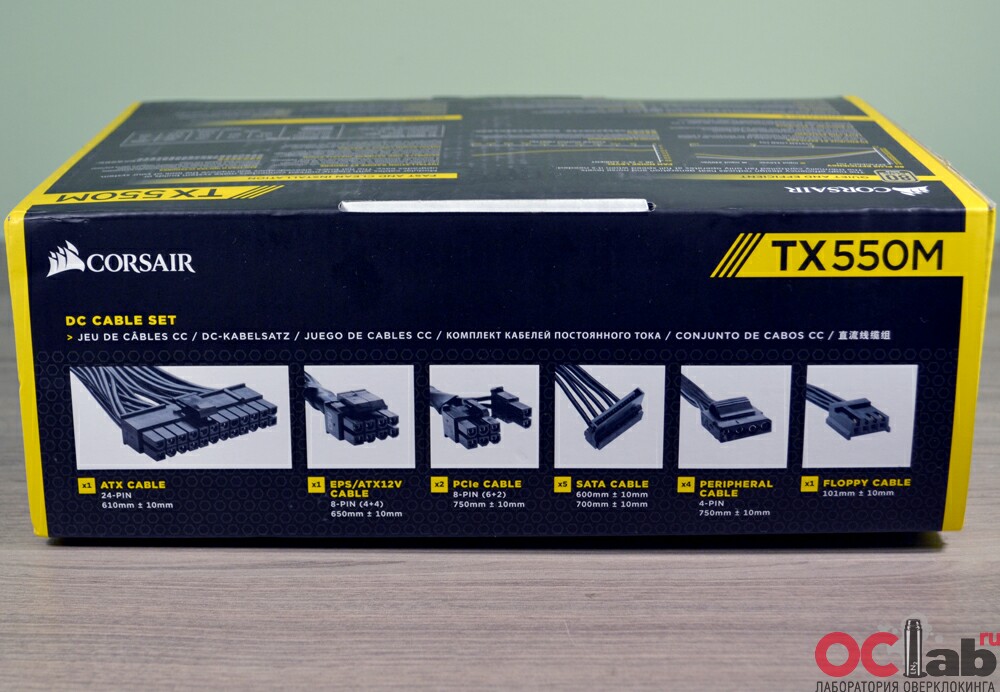
На одной из торцевых сторон указано количество разъемов имеющихся на кабелях БП.
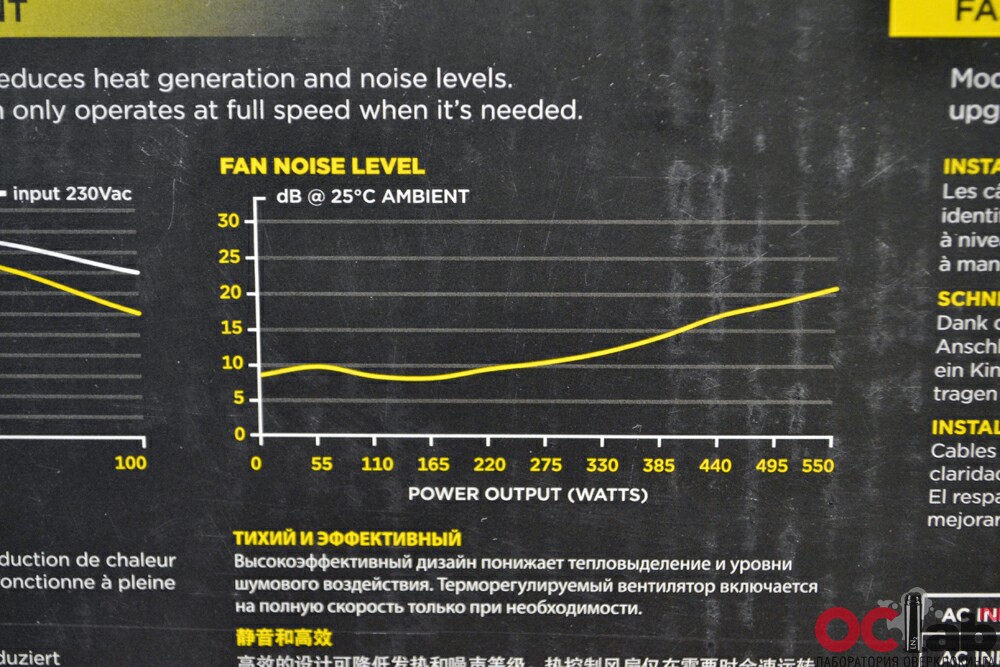
На двух графиках приведена информация о режиме работы вентилятора, а точнее его шумности. По заверению производителя на всем диапазоне мощностей максимальный уровень шума не превысит 20 дБ. На практике это действительно оказалось так, блок питания практически не слышим на открытом стенде, в корпусе его и вовсе не будет слышно.
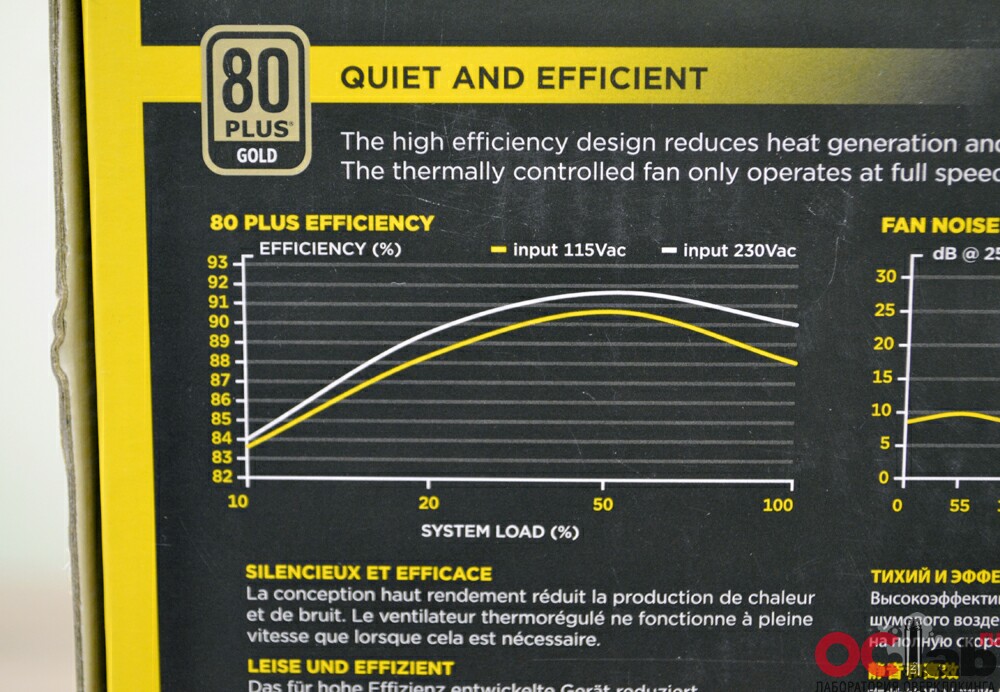
Corsair TX550M обладает сертификатом качества 80 Plus Gold. Это означает, что на всем диапазоне выдаваемой мощности уровень КПД будет не ниже 80%. Отличный показатель, выше этого только Platinum и Titanium, однако они стоят уже существенно дороже.
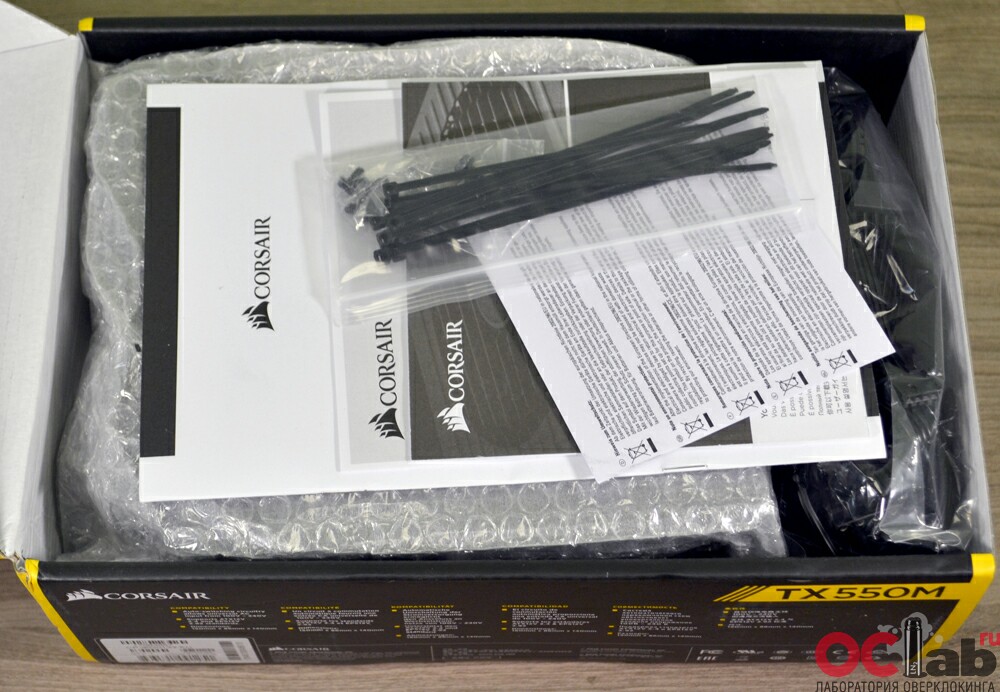
Внутри коробки все аккуратно упаковано и уложено.
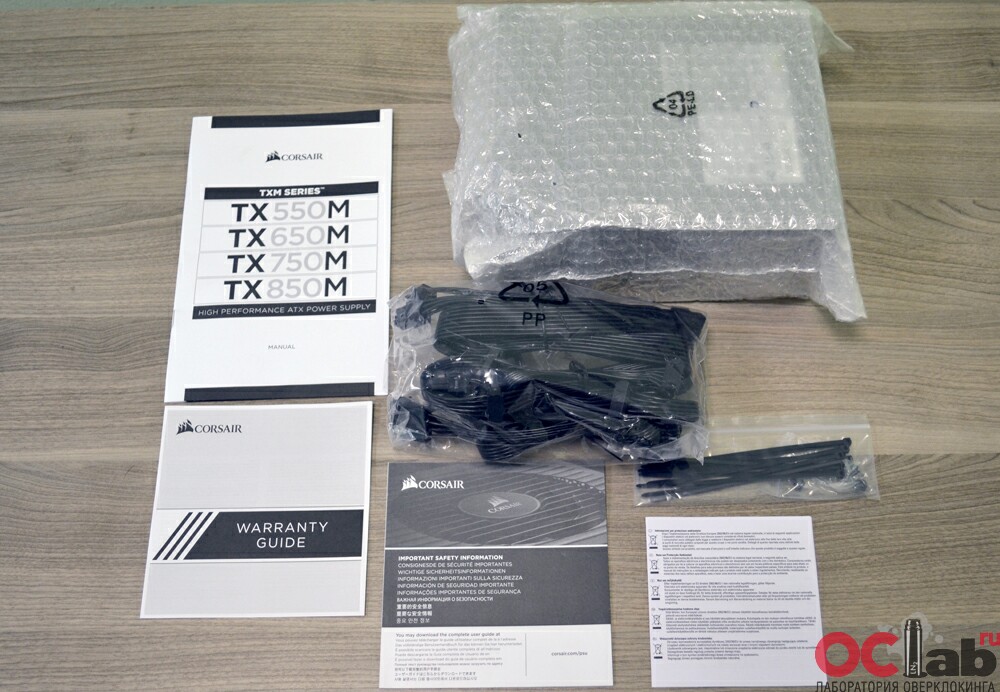

- блок питания Corsair TX550M;
- пакет с отстегивающимися кабелями;
- руководство пользователя и гарантийный талон;
- стяжки для укладки проводов.
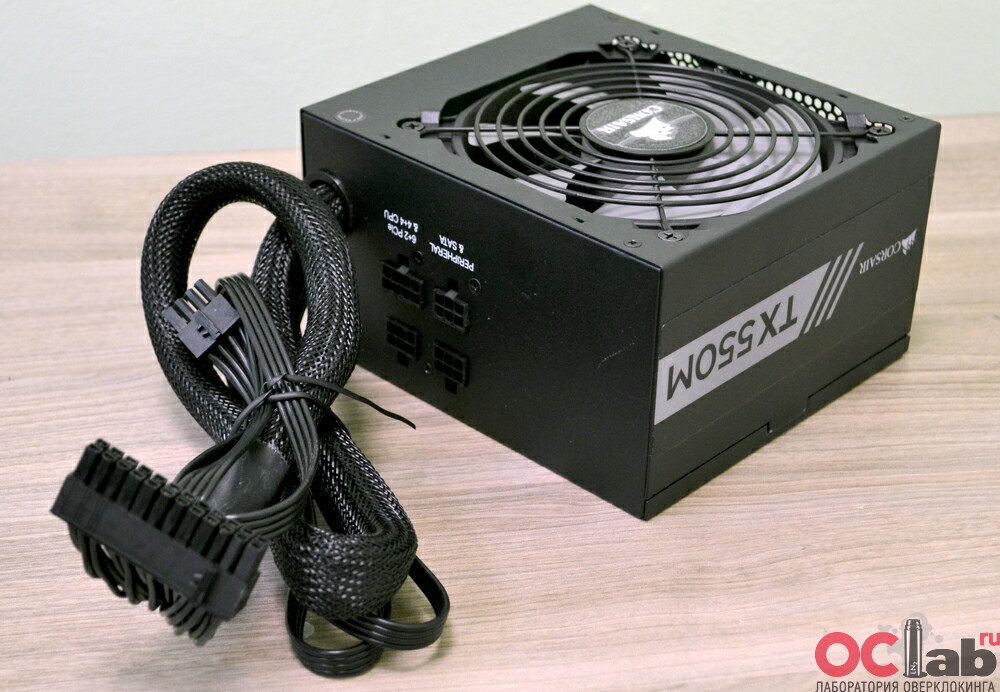
Внешний вид Corsair TX550M.
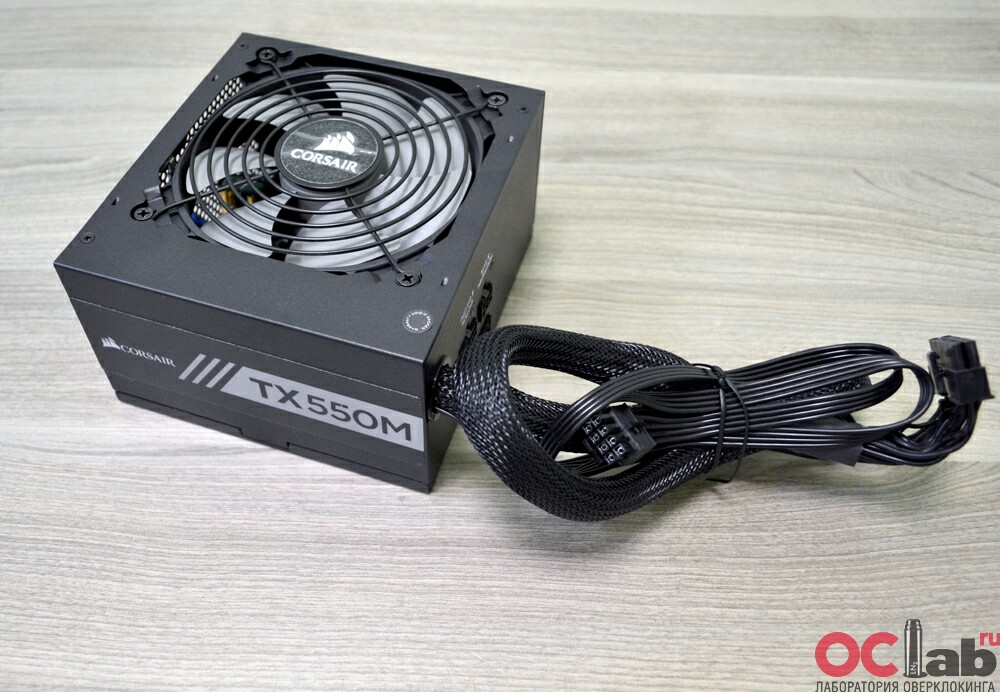
Блок питания Corsair TX550M имеет привычный для всех БП Corsair дизайн, с черной окраской и небольшими наклейками по бокам. Правда его габариты существенно меньше стандартных, примерно на 2 см в длину – 150 x 86 x 140 мм. Вес устройства 1.7 кг.
Corsair TX550M выполнен в частично модульной компоновке, пара основных кабелей 24-pin ATX и 8-pin EPS имеют жесткую фиксацию, а оставшиеся четыре отстегиваются.
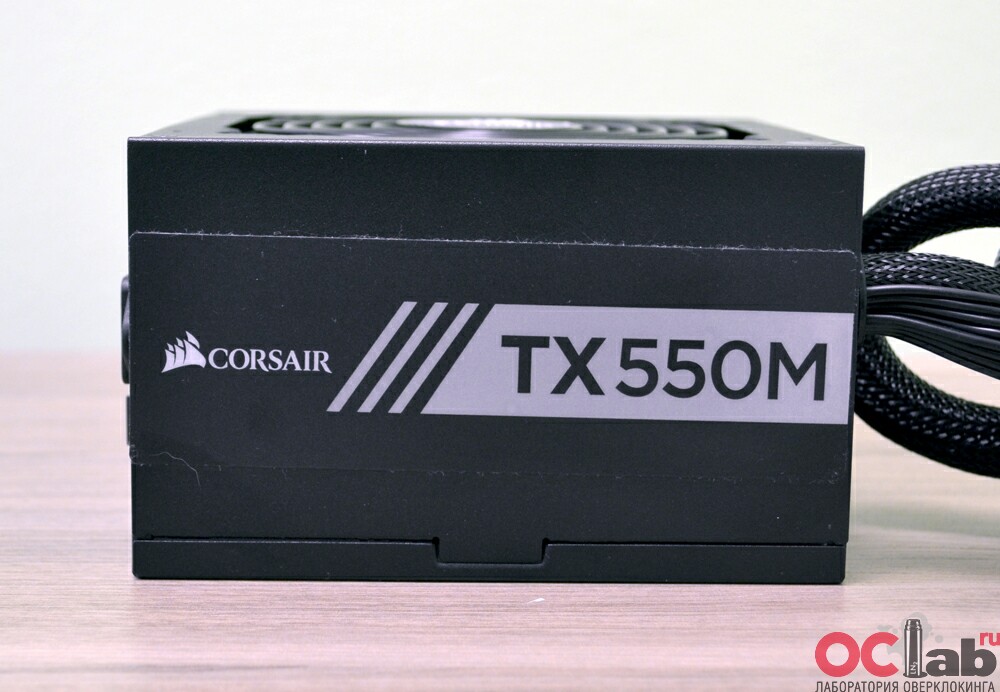
На боках БП присутствует фирменная наклейка с обозначением модели.
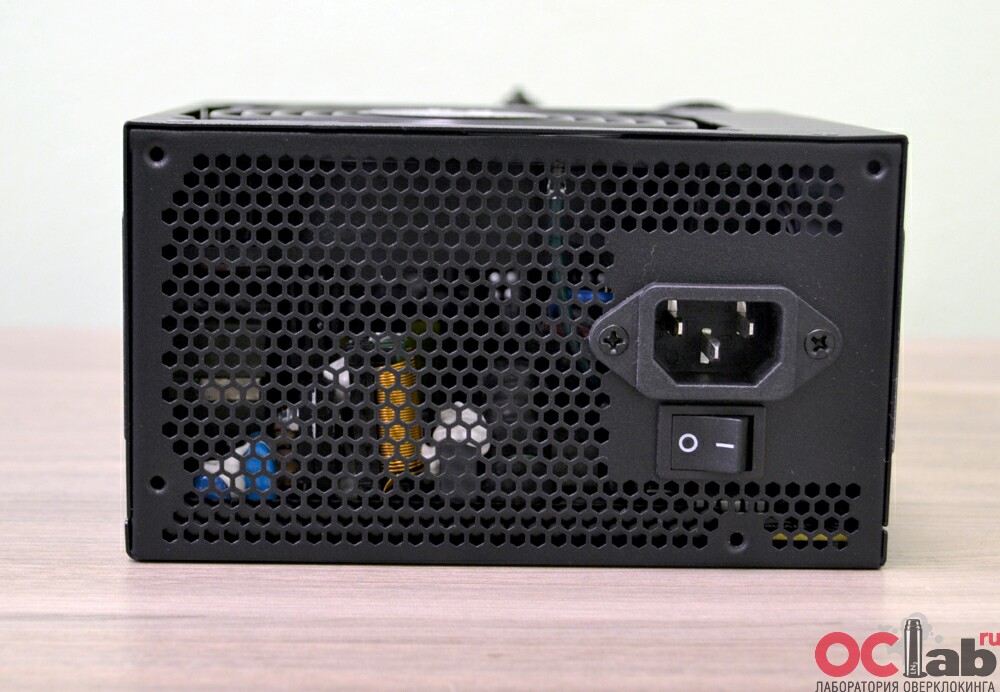
Тыльная сторона, практически по всей площади перфорирована, через эти отверстия нагретый воздух из БП уходит за пределы системного блока. Здесь же расположен основной выключатель и гнездо для подключения кабеля питания.
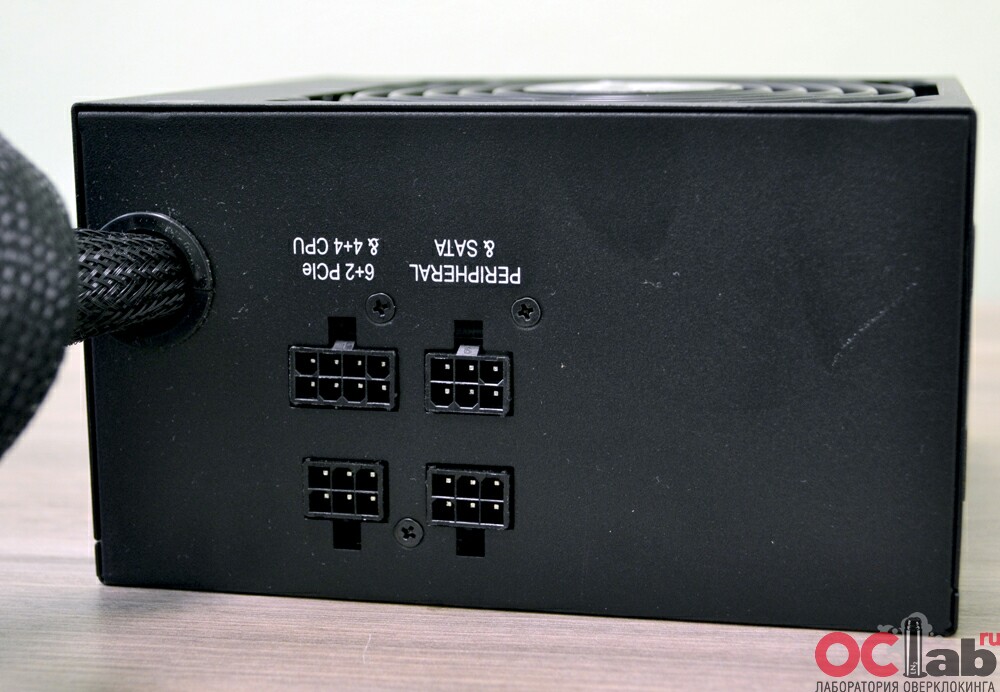
К Corsair TX550M можно пристегнуть еще четыре кабеля, три из которых будут питать периферию, а один видеокарту.


Компоненты блока питания охлаждаются при помощи 120 мм вентилятора NR120L. Вентилятор основан на новом подшипнике скольжения с винтовой нарезкой – rifle bearing.
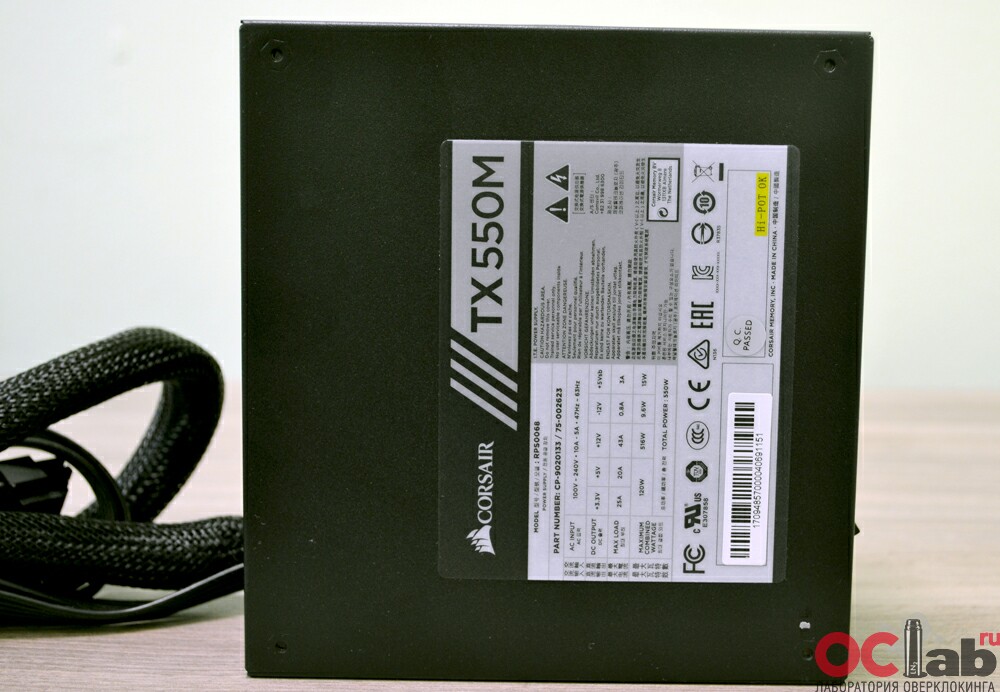

На противоположной стороне имеется наклейка с электрическими характеристиками блока питания.
| Источник питания Corsair TX550M ATX | ||||||
| Входной переменный ток | Выходной постоянный ток | |||||
| Вход переменного тока: 100 В – 240 В | Выход постоянного тока | + 3,3 В | + 5V | + 12V | -12В | + 5Vsb |
| Ток: 10A – 5A | Максимальная нагрузка | 25А | 20 A | 43А | 0.8A | 3A |
| Частота: 47 Гц – 63 Гц | Максимальная комбинированная мощность | 120W | 516W | 9.6W | 15W | |
| Общая мощность: 550 Вт | ||||||
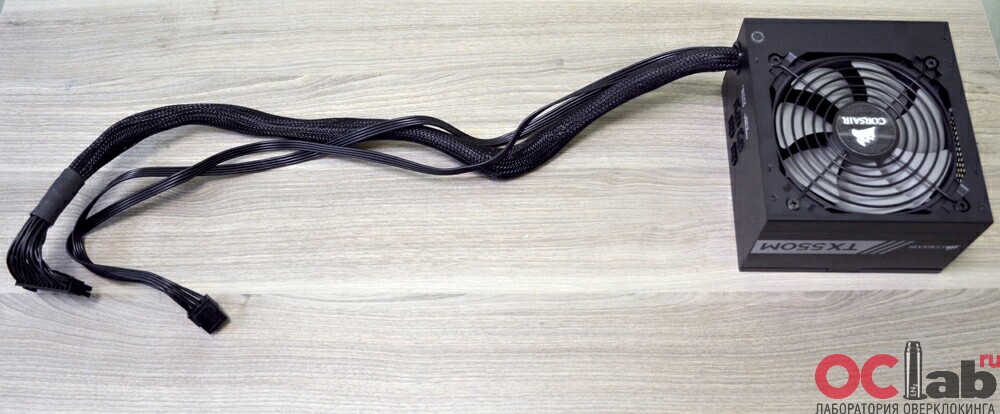

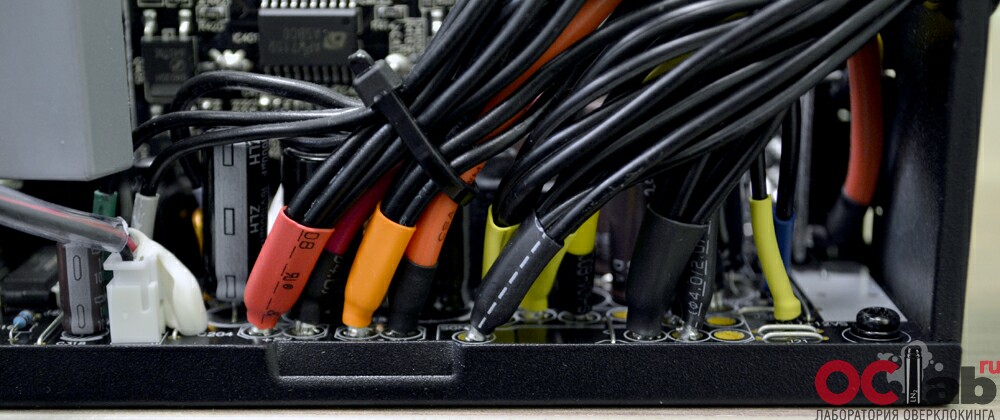
Неотсоединяемые кабели имеют длину 610 (24-pin ATX) и 650 мм (8-pin EPS).
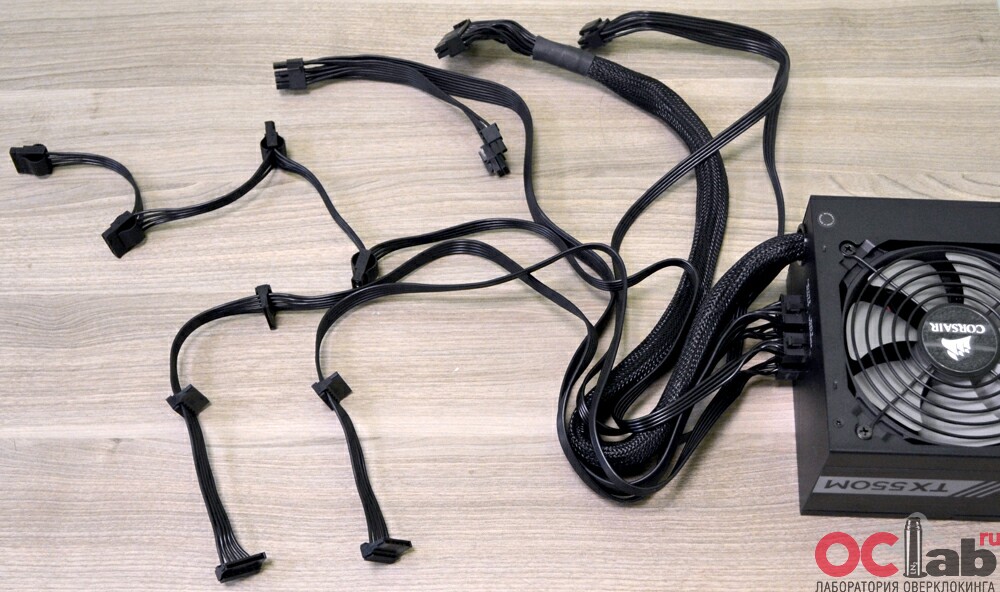
Подключив все кабели к Corsair TX550M в вашем распоряжении будет следующее количество коннекторов:
- 1 х 24-pin
- 1 x 8-pin EPS
- 2 x 6+2-pin PCI-e
- 5 x SATA
- 4 x Molex
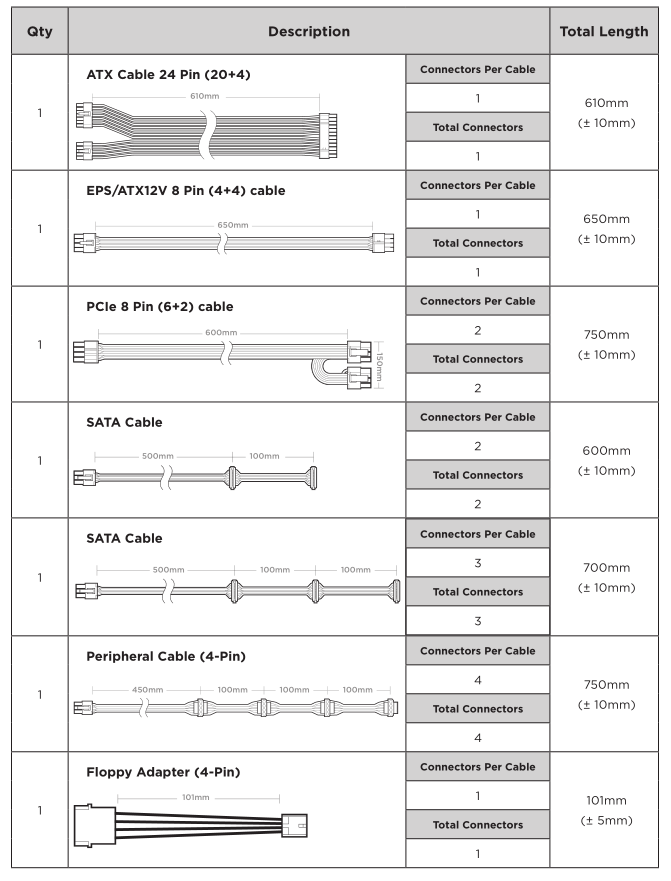
Ниже представлена картинка с длинами всех кабелей.
Внутреннее устройство Corsair TX550M.
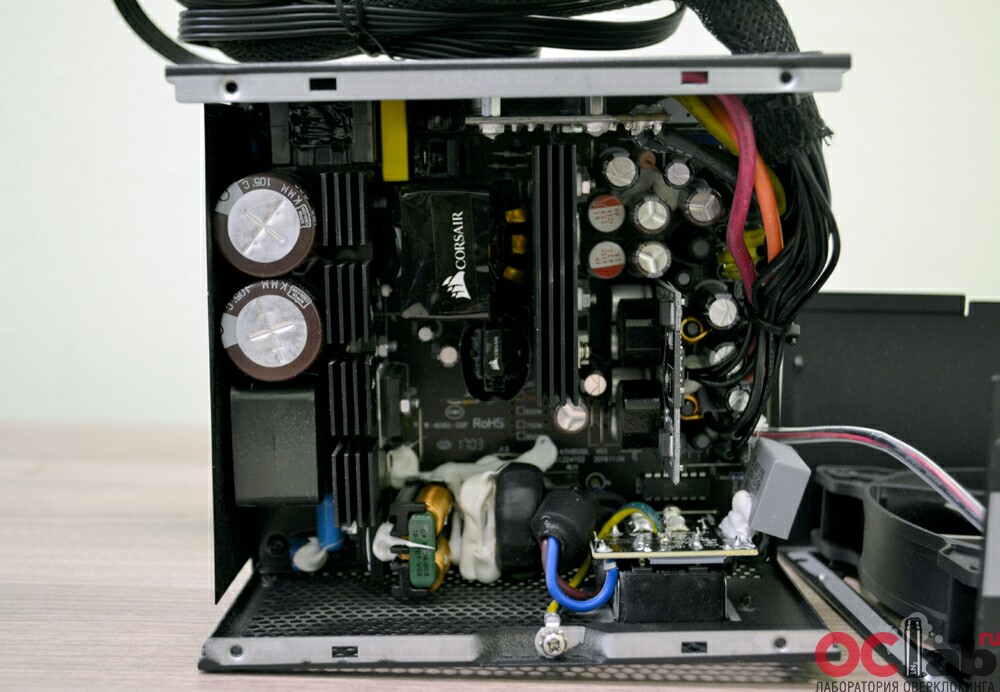
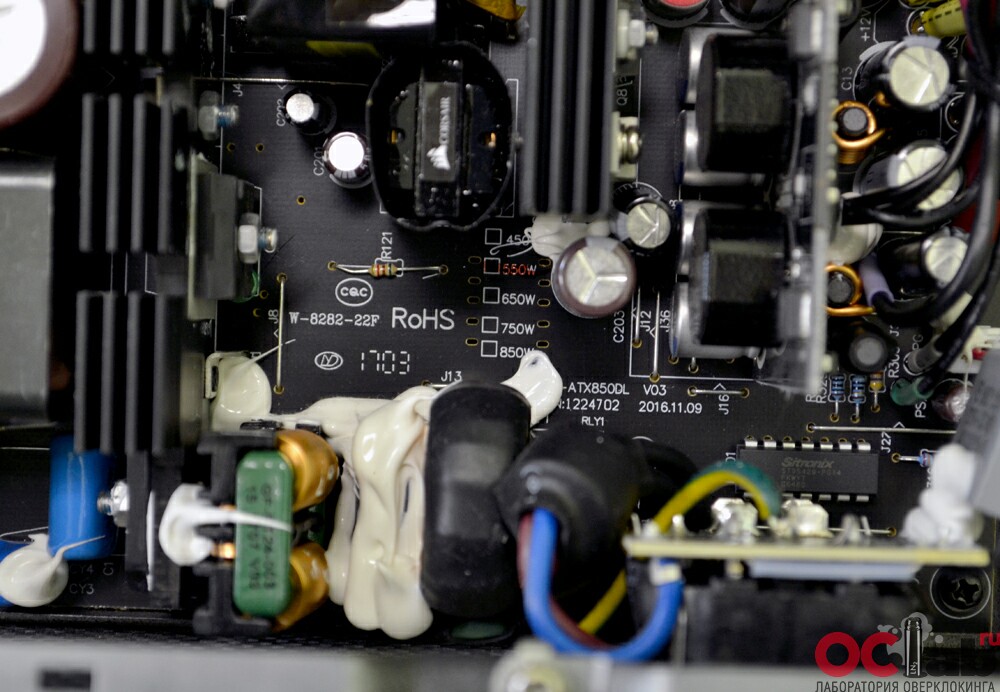
Блок питания Corsair TX550M выполнен на универсальной платформе, которая также используется для БП мощностью 450 Вт, 550 Вт, 650 Вт, 750 Вт, 850 Вт.
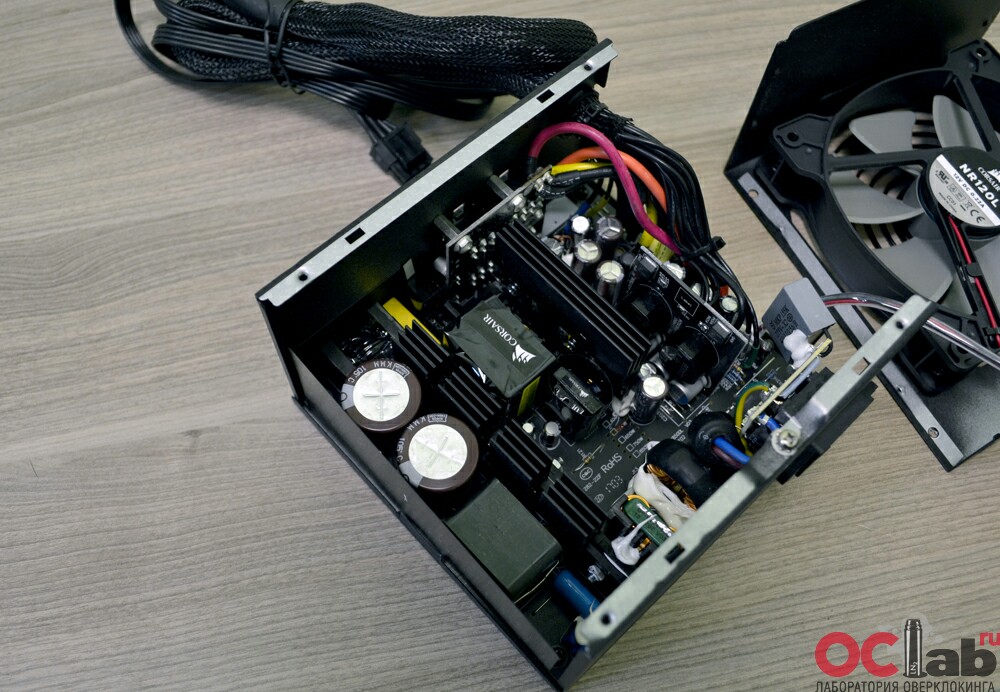
Разница между ними будет заключаться в некоторых компонентах и их количестве.
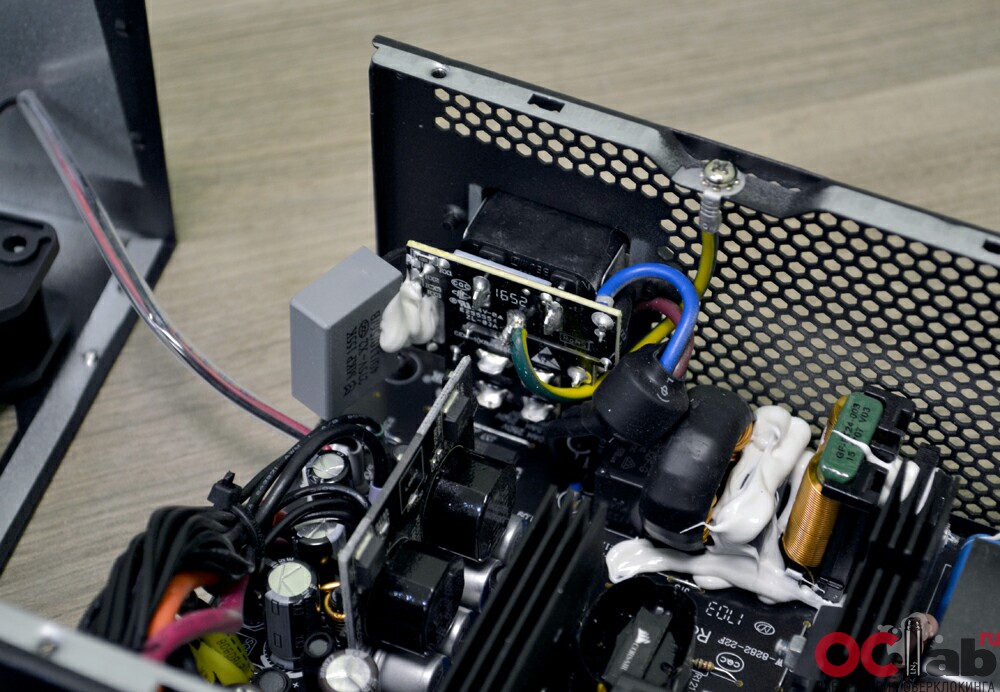
Входной фильтра размещен на отдельной небольшой печатной плате.
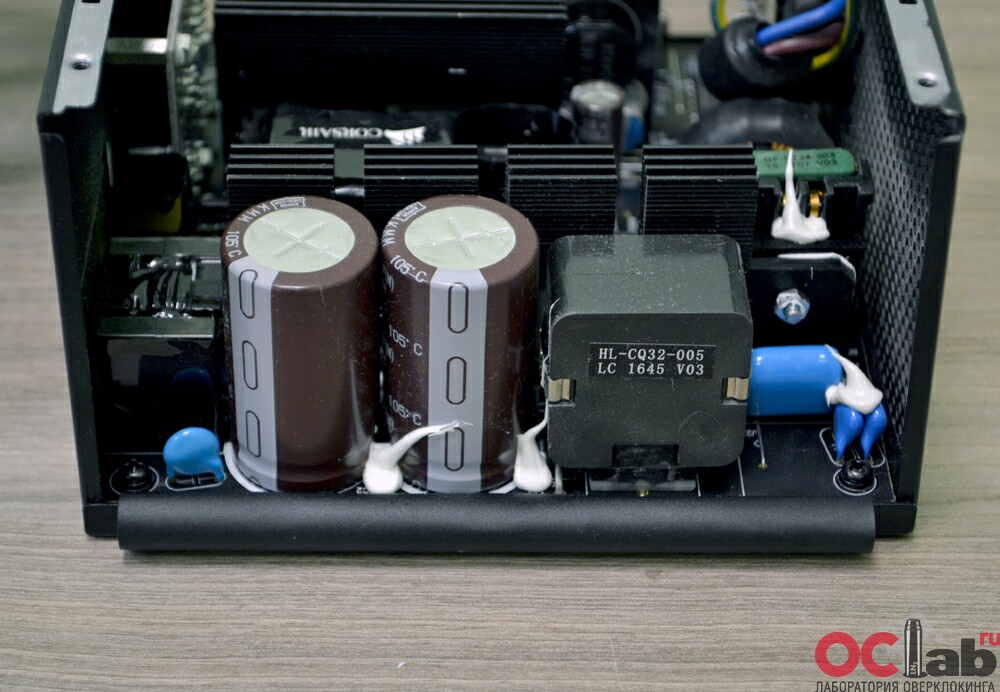
Высоковольтные конденсаторы произведены компанией Nippon Chemi Con. Рабочее напряжение – 450 В, емкость – 220 мкФ.
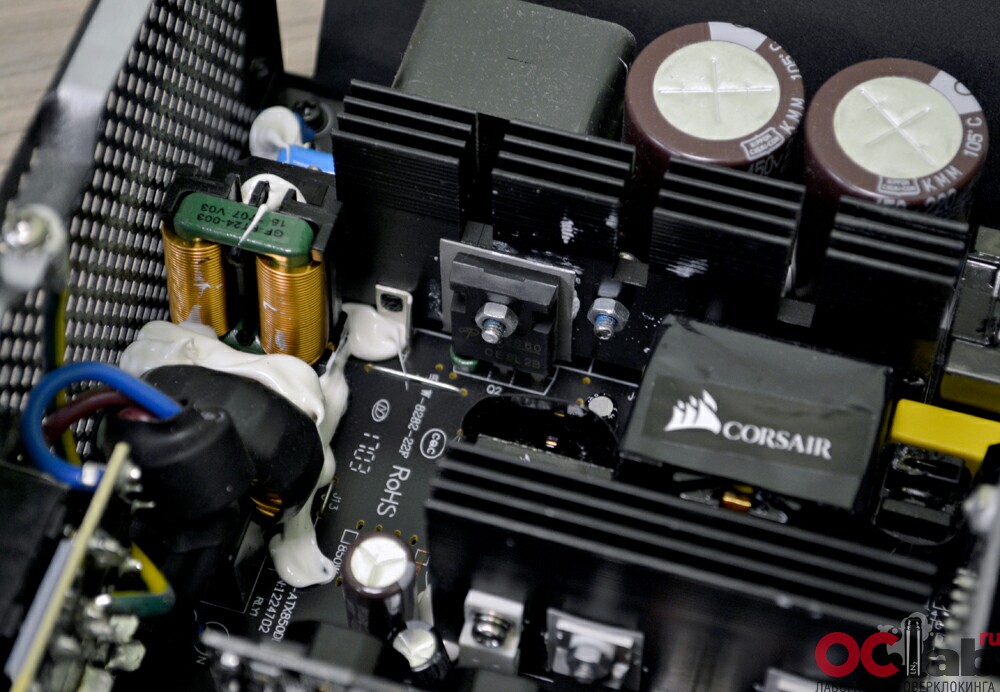
Основной радиатор, всего их два, отводит тепло от нескольких мосфетов, один из которых Alpha & Omega AOK42S60 с вольтодобавочным диодом CREE.
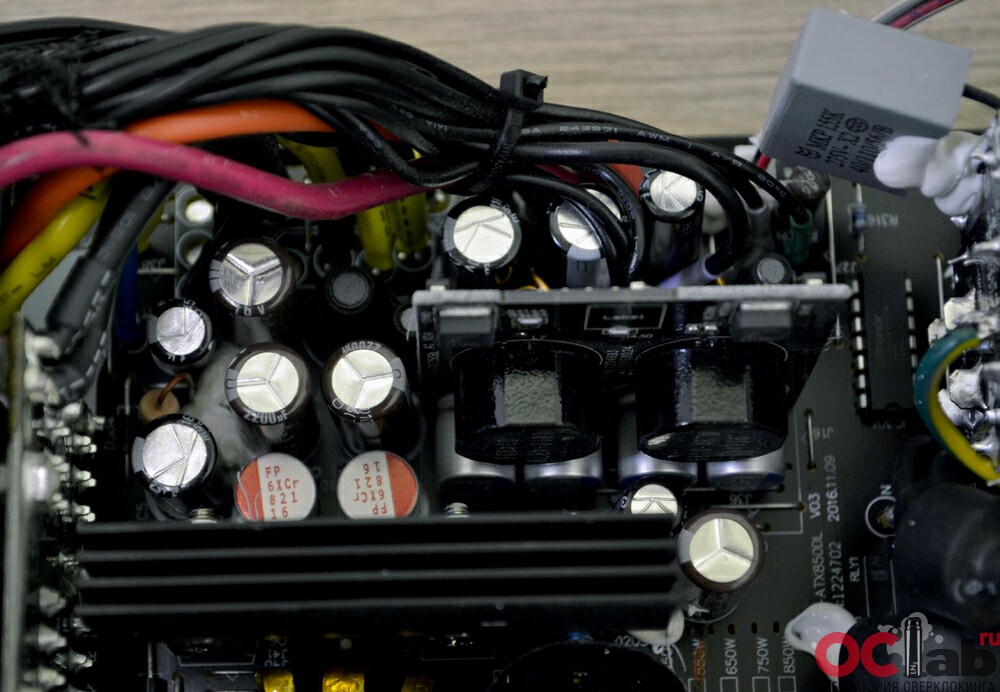
Выпрямление основной линии возложено на четыре мосфета AP9992GP.
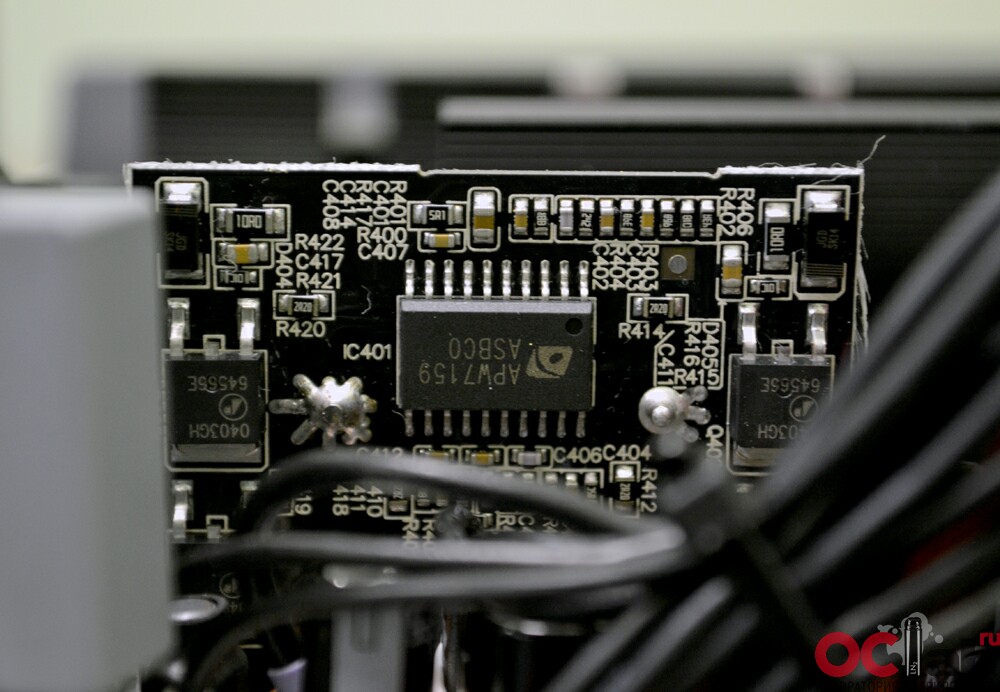
Контроллер ANPEC APW7159.
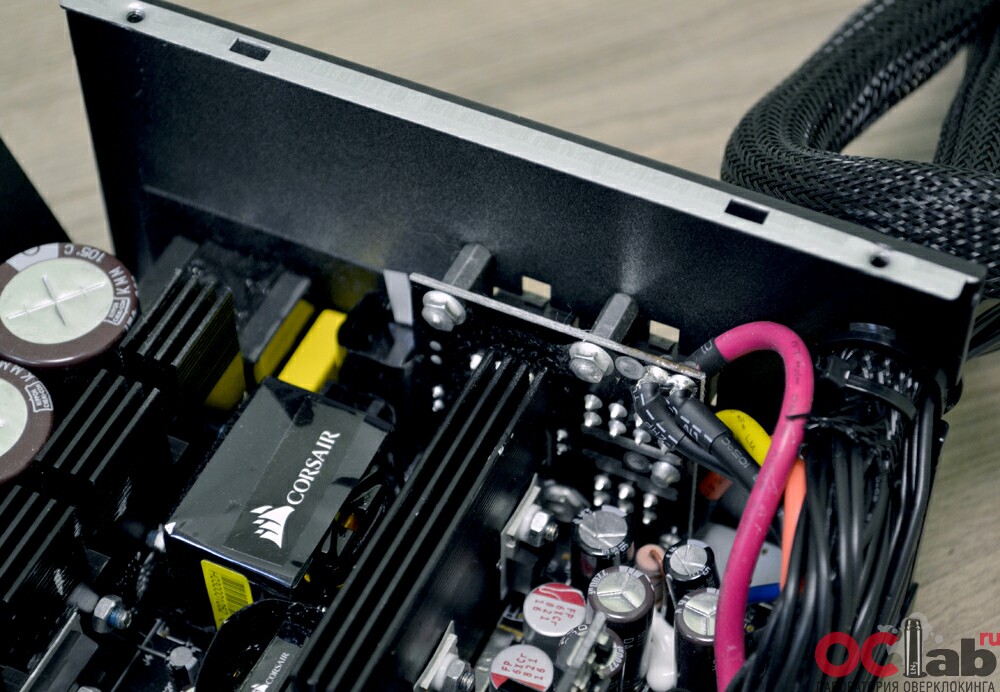
Отдельно хочется упомянуть о качестве пайки кабелей и компонентов – она как всегда на высоте!
Тестирование Corsair TX550M.
Тестовый стенд:
– Процессор AMD Ryzen 7 1800X
– Материнская плата ASUS Crosshair VI Hero
– Оперативная память DDR4-3600
– Видеокарта ASUS ROG Strix RX560 Gaming.
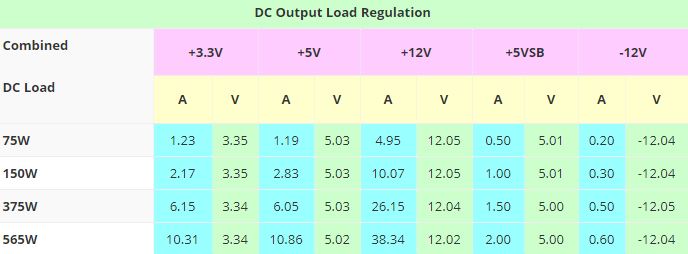
Стабильность работы блока питания мы решили проверить с помощью программы OCCT. Итоги тестирования в виде графиков приведены ниже.
Заключение
Компания Corsair, выпустив блок питания TX550M, в очередной раз подтвердила свое негласное звание одного из лучших производителей БП. Да, данная модель не самая дешевая на рынке, но за эту сумму денег вы получите отличный блок питания с семилетней гарантией.
Что же касается самого TX550M, то тут можно сказать следующее. Блок питания тихий и холодный, его мощности спокойно хватит на хорошую игровую сборку среднего или верхнего уровня с NVIDIA GeForce GTX 1080 и 4,6,8-ядерным процессором.
Во время тестирования блок Corsair TX550M выдавал стабильное напряжение по всем линиям без просадок, КПД при этом находился выше отметки в 80%, что не может не радовать.
По итогам тестирования блока питания Corsair TX550M мы смело рекомендуем его к покупке и присуждаем награду “Выбор редакции”!


