Введение в Bootstrap
Bootstrap представляет собой css-фреймворк для создания адаптивных веб-приложений. Проект Bootstrap изначально был создан и развивался разработчиками из Twitter для собственных нужд, однако затем вышел за границы твиттера и в настоящее время развивается как open source-проект и является одним из самых популярных фреймворков для создания веб-приложений. Что в принципе и неудивительно: в настоящее время все растет количество пользователей мобильного интернета, все больше людей для веб-серфинга используют смартфоны, планшеты. Что в итоге привело к увеличению числа сайтов с адаптивным дизайном и соответственно к увеличению популярности средств для разработки подобных сайтов, в том числе фреймворка Bootstrap.
Проекты ASP.NET MVC 5 по умолчанию уже содержат все необходимые файлы Bootstrap:
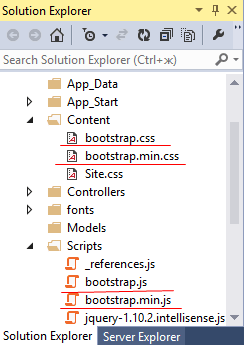
Функциональность Bootstrap заключена в файле стилей bootstrap.css и скрипте bootstrap.js. И если мы откроем мастер-страницу _Layout.cshtml, которая идет по умолчанию в проекте, то мы увидим подключение соответствующих библиотек:
/Content/css") подключает необходимые стили, в том числе и bootstrap, а выражение @Scripts.Render("
/bundles/bootstrap") подключает скрипт bootstrap. Мы можем это увидеть, открыв файле BundleConfig.cs:
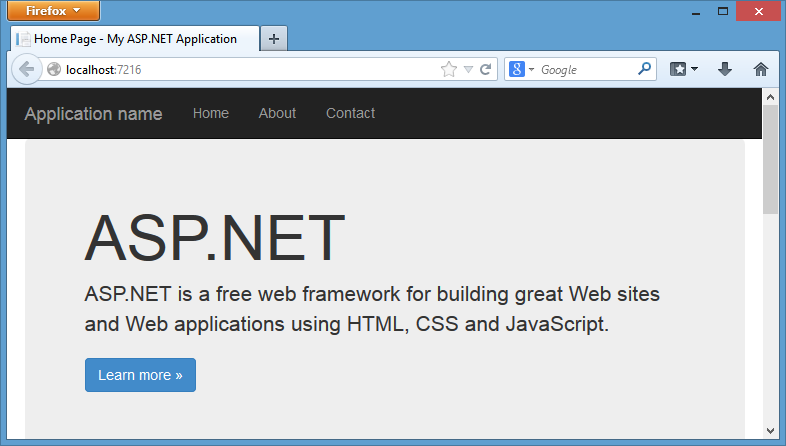
Также на мастер-странице мы можем увидеть использование таких классов css, как navbar, navbar-inverse, navbar-fixed-top и т.д. — все это классы bootstrap, которые позволяют адаптировать интерфейс страницы к различным устройствам. Например, запустим страницу в веб-браузере на ПК:
И если мы также запустим данное приложение на мобильном телефоне или эмуляторе, то мы увидим, что интерфейс по прежнему выглядит довольно неплохо:
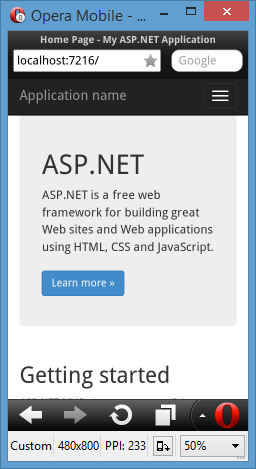
Собственно в этом и преимущество использования Bootstrap. Основой для адаптивного дизайна стали правила media queries, которые описывают стилевые свойства элементов для различных разрешений экрана. С точки зрения разработчиков Bootstrap все устройства можно поделить на следующие группы:
Очень маленькие, ширина экрана которых меньше 768 пикселей
Небольшие — их ширина от 768 пикселей и выше
Средние с шириной от 992 пикселя и выше
И большие с шириной от 1200 пикселей и выше
Это деление мы можем увидеть, если откроем файл bootstrap.css и найдем там правила media, например:
А теперь рассмотрим некоторые классы данного фреймворка.
Bootstrap является одним из наиболее популярных веб фреймворков для разработки отзывчивых веб приложений. Он предлагает множество функций, которые могут улучшить взаимодействие с пользователем, будь вы новичком во фронтэнд разработке или экспертом. Bootstrap представляет собой набор CSS и JavaScript файлов, а также он помогает вашему приложению эффективно работать на разных устройствах.
+.. contents:: Разделы: + :local: + :depth: 1
Начинаем
Есть несколько способов начать работу с Bootstrap. Если вы запускаете новое приложение в Visual Studio, то можете выбрать шаблон по умолчанию ASP.NET Core Starter, тогда Bootstrap будет изначально установлен:

Добавление Bootstrap в проект ASP.NET Core заключается только в том, чтобы добавить его в bower.json в качестве зависимости:
Это рекомендуемый способ добавить Bootstrap в проект ASP.NET Core.
Вы также можете установить bootstrap, используя какой-нибудь менеджер пакетов, такой как bower, npm или NuGet. В любом случае процесс будет фактически одинаковым:
Bower
NuGet
Лучше всего устанавливать в ASP.NET Core клиентские зависимости, как Bootstrap, через Bower (используя bower.json , как показано выше). Использование npm/NuGet показывает, как легко добавить Bootstrap в другие виды веб приложений, включая более ранние версии ASP.NET.
Если вы ссылаетесь на локальные версии Bootstrap, то вам нужно ссылаться на них на каждой странице приложения. В production версии приложения вы должны ссылаться на bootstrap, используя CDN. В шаблоне по умолчанию ASP.NET файл _Layout.cshtml выглядит вот так:
Если вы собираетесь использовать плагины Bootstrap jQuery, вам также нужно будет ссылаться на jQuery.
Базовые шаблоны и функционал
Базовый шаблон Bootstrap очень похож на файл _Layout.cshtml, показанный выше, и включает в себя базовое меню навигации и место для отображения остальной части страницы.
Базовая навигация
Шаблон по умолчанию использует набор элементов
Сюда также включено имя приложения, которое появляется вверху слева. Основное навигационное меню отображается с помощью элемента
- внутри второго div и включает в себя ссылки на Home, About и Contact. Дополнительные ссылки на Register и Login добавляются в _LoginPartial на строке 29. Основное тело каждой страницы отображается под навигационным меню в другом

Меню с кнопкой “hamburger” вверху справа появляется тогда, когда ширина окна меньше заданной ширины:

Если нажать на иконку, то соответствующие элементы меню будут представлены вот так:

Типография и ссылки
Bootstrap настраивает базовую типографию сайта, цвета и форматируют ссылки в своих CSS файлах. Этот CSS файл включает в себя стили по умолчанию для таблиц, кнопок, элементов форм, изображений и так далее (см.). Особенно полезным функционалом является система сетчатой верстки.
Сетки
В современных веб приложениях лучше всего избегать при верстке тэг
Система сетчатой верстки Bootstrap основывается на 12 колонках. Это число было выбрано потому, что тогда сетку можно разделить на 1, 2, 3 или 4 колонки, а ширина колонки может варьироваться до 1/12ой от вертикальной ширины экрана. Чтобы начать использовать эту систему, вам стоит начать с контейнера
Далее, добавьте дополнительные элементы
| Префикс CSS класса | Устройства | Ширина |
|---|---|---|
| col-xs- | Телефоны | = 768px |
| col-md- | Компьютеры | >= 992px |
| col-lg- | Большие ПК | >= 1200px |
Мы определяем две колонки с “col-md-6”, и в результате у нас и будут две колонки с разрешением для ПК, но эти колонки располагаются вертикально при отображении на более мелких устройствах (или в более узком окне браузера на ПК), позволяя пользователям легко просмотреть контент без необходимости горизонтального скролла.
По умолчанию у Bootstrap всегда одноколоночная верстка, так что вам нужно указать колонки, если вам необходимо большее их число. Единственный раз, когда вам потребуется напрямую указать, что

В примере выше One и Two делят строку при верстке “md”, тогда как Two и Three делят строку при верстке “xs”. Без clearfix

В этом примере использовалась только одна строка
Jumbotron
Если вы используете шаблоны по умолчанию ASP.NET MVC в Visual Studio 2012 или 2013, вы вероятно видели, как работает Jumbotron. Он касается больших разделов страницы на полную ширину, которые можно использовать для отображения большого изображения заднего фона, для вызова действия, вращения или похожих элементов. Чтобы добавить на страницу jumbotron, просто добавьте

Кнопки
Основные классы кнопок и их цвета показаны на рисунке ниже.
Значки
Значки — это маленькие, обычно цифровые выноски рядом с элементами навигации. Они могут обозначать сообщения или уведомления, а также наличие обновлений. Чтобы указать значок, нужно просто добавить , содержащий текст, с классом “badge”:

Оповещения
Иногда нам требуется отобразить некоторые уведомления, оповещения или сообщения об ошибках. Здесь вступают в игру стандартные классы оповещений. There are four different severity levels, with associated color schemes:

Навигационные и обычные меню
В нашу верстку уже включено стандартное навигационное меню, но Bootstrap поддерживает дополнительные опции стилизации. Мы также можем легко отображать навигационное меню вертикально, а не горизонтально, если так надо, а также добавить поднавигационные элементы. Просты навигационные меню, например, ленты вкладок, размещаются вверху элементов
- . Их можно очень просто создать, снабдив их CSS классами “nav” и “nav-tabs”:

Навигационные меню создаются сходным образом, но они немного сложнее. Они начинаются с или

Дополнительные элементы
Тему по умолчанию также можно использовать, чтобы довольно симпатично представить HTML таблицы, включая поддержку представлений в полоску. Также существуют метки (labels) со стилями, которые похожи на стили кнопок. Вы можете создавать пользовательские выпадающие меню, поддерживающие дополнительные опции стилей вне стандартного HTML элемента . Если вам нужен индикатор прогресса, можно выбрать несколько разных стилей, а кроме того есть группы списков и панели, которые включают в себя заголовок и контекст.
Другие темы
Вы можете расширить стандартную Bootstrap тему, переопределив CSS, добавив цвета и стили, которые нужны вашему приложению. Если вы хотите использовать готовую тему, есть несколько галерей, доступных онлайн, например, WrapBootstrap.com (здесь есть много платных тем) и Bootswatch.com (здесь находятся бесплатные темы). Некоторые из платных тем предлагают отличный дополнительный функционал, например, расширенную поддержку для меню администратора, панели с классными графиками и индикаторами. Одной из самых популярных тем является Inspinia, и стоит она на данный момент $18. Она включает в себя шаблон ASP.NET MVC5 в дополнении к версиям AngularJS и статического HTML.

Если вы хотите создать свою собственную панель с элементами, начните вот с такого примера: http://getbootstrap.com/examples/dashboard/.
Компоненты
Также Bootstrap включает в себя поддержку некоторых встроенных UI компонентов.
Glyphicons
Bootstrap включает в себя наборы иконок из Glyphicons (http://glyphicons.com), где доступно 200 иконок, которые можно бесплатно использовать. Вот простой пример:
Группы Input
Группы Input позволяют связывать дополнительный текст или кнопки с элементом input:

Breadcrumbs
Breadcrumbs — это общий UI компонент, который используется, чтобы показать пользователю недавнюю историю в навигационной иерархии сайта. Добавьте этот компонент, присвоив класс “breadcrumb” любому элементу
- . Включите встроенную поддержку для нумерации страниц, используя класс “pagination” для элемента
- внутри . Добавьте слайдшоу и видео с помощью элементов , , или , которые Bootstrap стилизует автоматически.
Поддержка JavaScript
Библиотека Bootstrap JavaScript включает в себя поддержку API для включенных компонентов, позволяя вам контролировать их поведение внутри вашего приложения. Кроме того, bootstrap.js включает в себя несколько пользовательских jQuery плагинов, предоставляющих дополнительный функционал, как переходы, модальные диалоговые окна, обнаружение прокрутки (обновление стилей, основанное на том, где пользователь остановился при прокрутке страницы), карусели и тд. См. http://getbootstrap.com/javascript/.
Резюме
Bootstrap используется для быстрой и эффективной стилизации различных веб сайтов и приложений. Есть базовая типография и стили, которые можно дополнить более сложной платной и бесплатной поддержкой. Он поддерживает множество веб компонентов, использование которых требовало в прошлом невероятных усилий.
Web Development, Sensibly
Search
About This Site
This blog is written by a full-stack web developer on a quest to make web dev a little more sensible.
Categories
Archives
Affiliate Disclosure
This site contains affiliate links to products. I may receive a commission for purchases made through these links.
SiteGround
Bootstrap for .NET Devs

Personally, I don’t consider myself to be much of a designer, which is why I turn to front-end frameworks when developing my projects. Bootstrap is, of course, one of the most popular front-end frameworks, and integrates well with the .NET ecosystem. However, by default, new .NET projects ship with Bootstrap 3 instead of the recently updated Bootstrap 4. In this guide, I’d like to take a look at how to update a project from Bootstrap 3 to Bootstrap 4. We’ll then examine several MVC Bootstrap form examples in both MVC 5 and .NET Core.
Let’s imagine that we’re building an app for a veterinarian’s office to keep track of pet appointments. We’ll start with a simple model, and add onto it as we look at more complicated examples.
ASP.NET MVC 5 Bootstrap 4
Let’s begin with MVC 5 before moving on to .NET Core. Many of you may be using Core (and if you haven’t tried it, I would suggest you do!). However, a lot of us are still operating in MVC 5, which is still a perfectly viable solution for web development.
Start by creating a new project.


By default, the project is set up with Bootstrap 3. We’ll need to change the CSS and JavaScript references from Bootstrap 3 to Bootstrap 4.
One easy option is to install Bootstrap 4 from the Package Manager Console. Simply type this into the console:
Alternatively, you could click on Tools -> Nuget Package Manager -> Manage Nuget Packages for Solution…
Then, click on Browse and search for “bootstrap”.

Whichever way you do it, you’ll install the Bootstrap 4 nuget package. Installing that package will overwrite the bootstrap.js file in the Scripts folder and the bootstrap.css file in the Content folder. It will also add a number of other files to those two folders, most of which you don’t need to worry about.
Here’s one snag you might run into. When I tried to run the project locally at this point, Intellisense detected errors in the TypeScript file index.d.ts, found in the Scripts folder.

It has something to do with popper.js, which is included with Bootstrap 4. I couldn’t figure out what exactly was going on here, so I simply excluded it from my project and everything compiled fine. If you have a suggestion as to how to fix this, please let me know in the comments. Popper.js is a neat library, but it’s not essential for creating forms in Bootstrap 4.
In any case, let’s run our project and see what happens.

All right, we have a home page. As you can probably notice, that navigation bar doesn’t look right. That’s because Bootstrap 4 made some changes to how the navbar works, so we’ll need to change our layout.
Before you dive in to the next section, where you’ll be seeing a lot of code, I want to tell you about something that might make your day easier.
Sometimes it really helps to see code in context. Want to get the complete Visual Studio solution for every example in this post? You can get it, right now, in my book Bootstrap for .NET Devs. Check out the sample chapters instantly, for free.
Navigate to the layout file in Views -> Shared -> _Layout.cshtml. We need to remove the div with the >navbar (the first element in the HTML body). Replace it with this:
If you don’t use the Login partial, feel free to remove it. Otherwise, you’ll need to change the _LoginPartial.cshtml code to:
Now, let’s take a look at our homepage. If you run the project, you should notice an ugly white bar on top of your navigation. This is because the default template used a fixed navbar, and the default styles are pushing the main content down. Otherwise, the main content would be underneath the navbar.
Since we’re not using a fixed navbar, we should get rid of that styling. Go to Content/Site.css and remove these lines:
You can actually remove all of the default styles if you want (though you don’t have to).
Now you can run the project again, head back to the homepage, and see our adjustments in all their glory:

Sweet. Adjusting the navbar to your exact taste is beyond the scope of this article, but what we’ve coded will be enough to make your application, as a whole, not look broken.
Bootstrap 4 Basic Form
Scaffold a new controller with views, using the Visit.cs class from earlier, and take a look at the Create.cshtml file. Now we have a form to play with. In order to make this compliant with Bootstrap 4, replace the code in that file with this:
This will give us a very basic, but still functional, form. Labels and inputs are wrapped in a div with the form-group >form-control class.
Bootstrap does have >invalid-feedback . However, for these to work, you need to add the needs-validation and was-validated >text-danger class to color the validation message red.
Here’s what our form looks like:

Let’s improve this a little. If you want to make those labels more human-readable, add the DisplayName data annotations to your class.
Also, you may have noticed that the inputs are rather short. This is because the default project has a Site.css file that sets all inputs, selects, and textareas to a max-width of 280px.

If you’re okay with this, feel free to keep it this way. However, I would recommend deleting it and using Bootstrap’s responsive grid system instead.
If you’ve deleted the CSS above and added the DisplayName attributes to the model, your form should now look like this:

Great! We’ll look at adding the grid system later to make those inputs not look so ridiculously long. For now, let’s just run through examples of some of the other HTML inputs. We’ll add the following types of inputs to our model and view, with the appropriate Bootstrap classes:
Here are the properties we’ll add to our model class:
And here are the form fields we add to our Razor view:
From this, the new fields on our form look as follows:

The checkbox uses a few different classes than a standard text input, and has a bit of a different HTML structure. If you want to make a list of checkboxes, where the user could select one or more values, that’s a more complicated process. I would also consider it outside of the scope of this post, since there are many options to make it work, and it requires more footwork in the controller. I would suggest taking a look at this Stack Overflow post as a place to start looking for a solution.
For the radio buttons, we have a similar structure to the checkboxes, but with the type set to “radio” instead.
The textarea is rendered as such due to the multiline text DataType data annotation in the model. The number and range types, on the other hand, can’t be set in the model, so we need to add the types manually in the htmlAttributes . (Also, keep in mind that for a real currency value, you’d want to use a decimal instead of an integer. I’ve used this only as a simple example.)
The telephone type has its own special data annotation, [Phone] , which will put the correct input type on the HTML element, as well as validate the phone number with an appropriate regular expression. You can read more about this in my post about validating phone numbers in MVC.
Date Input: A Gotcha and a Solution
Try creating a new Visit, which will insert a row in the table. Then, navigate over to the Edit view for that visit. The url should look something like http://localhost:YOURPORT/Visits/Edit/1 . You should notice something funny about the VisitDate input.

What happened to our visit date? If we take a look at the developer console, we can see a warning that explains why.

ASP.NET is rendering the field value in a format that isn’t to the HTML5 date specifications. One way to change this is to add a string format annotation to our model, like this:
This will set the input value in the correct format. However, now the date will be in this format wherever we use the model, like our index of visits.

If you don’t want your date to look like this everywhere, we have a problem. One solution, though one that I don’t recommend, is to put the format string manually in every view. Here’s an example for the index:
Of course, this means that we need to set the date format manually in every view, which makes maintaining the application much more difficult. My recommended solution is to use different ViewModels to represent the views you need in each format. That way, you just have to define the different displays once. You can read more about what ViewModels are and how to create them in my post about AutoMapper. The part about using AutoMapper is tied specifically to .NET Core, but the explanation about ViewModels is applicable to any flavor of web development.
Bootstrap 4 Advanced Responsive Form Layouts
With Bootstrap’s responsive grid system, you can make all sorts of layouts for your forms. Here’s a simple one to constrain the width of the form inputs. The inputs will be half-width at medium screen widths and above, and full-width below that:

Form Grid
We can also use the grid system to make more complicated layouts.

Form Row
If you change the row CSS >form-row , you’ll get columns with tighter gutters. You can be the judge of whether this looks better or not.

Horizontal Forms
You can also create horizontal forms. To do so, you’ll need to add the row class to the form groups. Then, you’ll need to add a column class to the labels, and add a column wrapper around the input and validation message. That might look something like this:

This should be enough examples to get you started on your forms for ASP.NET MVC 5. Let’s turn our attention to .NET Core, and see how Bootstrap 4 works there.
ASP.NET Core Bootstrap 4
I was hoping that installing Bootstrap 4 to a Core project would be easy. Unfortunately, knowing the best way to do this is neither straightforward or clear. The built-in way to manage front-end packages is to use Bower. However, this has its own issues. I’ll first describe how to use Bower, and then talk about a few of the alternatives.
Start by creating a new project in ASP.NET Core. You can use just about any options you want here.
After you’ve created the project, we need to create a bower.json file. Right click on your project in the solution explorer, then Add New Item… Add a new Bower Configuration file.

If you don’t see this type in your templates, then just create a file in the root of your solution and call it bower.json. Then add the following text to it:
Now that we have our configuration file, we need to add Bootstrap 4. From the menus, choose Project -> Manage Bower packages…

Then, click on Browse. Bootstrap 4 should be the first item in the list, but if it’s not, go ahead and search for it. Then, click on install.

Once you’ve done this, the bower configuration file will be updated to include Bootstrap 4.1.1 (or whatever version you’ve installed). You’ll also find that Boostrap has been installed to wwwroot/lib/bootstrap. This is where we’ll reference the library in our layout.
Now for the problems. Even though this works fine, it appears that Bower is on the way out. Even the Bower homepage recommends migrating to Yarn and Webpack to accomplish the same thing. Another option is to use npm for managing your packages. Migrating to any of these takes a bit more effort than using, say, Nuget, and I’m personally still researching these alternatives. If you want to try out Yarn or npm, here’s one place to get you started:
In any case, you’ll need to get the correct Bootstrap 4.0 style sheet to /lib/bootstrap/dist/css/bootstrap.css and the Javascript to /lib/bootstrap/dist/js/bootstrap.js. You could always download the files directly from the Bootstrap 4 website and copy the files over manually.
An Even Better Option
Another option, and the best, in my opinion, is to use Gulp and npm. I outline how to do this in Bootstrap for .NET Devs, the book I’m working on. That particular section is in the sample chapters, which are free. If you like what you see, you can also lock in your price now and get free updates for life.
Now, let’s turn our attention to the _Layout.cshtml file in the Pages folder.
.NET Core Site Layout
Notice that .NET Core makes use of different environments, like “Development” and “Production.” The layout file includes several tags to specify which script and style files to use in each environment. As is, the local files are used in development, with the CDNs used in production (with the local files listed as a fallback). Our local copies of Bootstrap have been updated to version 4 already. We’ll just want to update the URL of our CDNs. The exact link will differ depending on which version is current when you’re creating the project. As of this writing, the current version is 4.1.1. You can find the URLs in a number of different places, but you should be able to find them easily enough on the Bootstrap home page in the “Getting Started” section.
In our example, you’ll want to change the stylesheet references in the head to this:
And the script references to this:
If you want to use popper.js, you’ll need to add those references as well.
Let’s fix the navbar. Like in the MVC 5 example, you’ll want to change the nav element that appears as the first child of the body tag. Change it to this:
If you use the _LoginPartial, change its markup to:
Also, as in the earlier example, you’ll want to remove the following lines from wwwroot/css/site.css:
Once you delete those lines, the home page should look something like this:

If you scroll down a bit, you’ll notice that the carousel styles are now messed up, and the page looks a bit ugly. Don’t worry about this. You’re not going to be using Microsoft’s default home page, and you shouldn’t be using a carousel anyway.
Bootstrap 4 and .NET Core: Basic Form
Create a Visit.cs file in the Models folder with the same properties as our MVC 5 example. Then, create a Visits folder nested under the Pages folder. Finally, right click on Visits, choose Add -> Razor Page… and select Razor Pages using Entity Framework (CRUD). Once you click on the Add button, you should see a series of Razor Pages based on the Visit class.
Navigate to the Create.cshtml file.

Now let’s update our form layout to account for the Bootstrap 4 >Visit class that we used above in the MVC 5 example.
You’ll notice that we’re using Tag Helpers now instead of Html Helpers. I personally prefer the Tag Helpers, as I find them less verbose and more like standard HTML. Aside from this change, there are only two other aspects to note that are different from our previous example.
Our textarea field has to be defined as a textarea in the HTML markup (as opposed to letting the EditorFor method determine the tag type). Because of this, we can delete the [DataType(DataType.MultilineText)] data annotation from the Notes field on our model. The data annotation doesn’t change the rendered element anymore, so we can get rid of it.
We also no longer have to worry about inconsistent DateTime formatting in our date fields. If you copy the layout above into the Edit.cshtml file and test it out, you’ll notice that .NET Core automatically formats the date into yyyy-MM-dd format to play nice with Chrome. This is awesome. We don’t have to create a ViewModel to deal solve this problem anymore (though you might want to create a ViewModel for other reasons). This means that we could put this data annotation on our date field:
This would display the date in that format on, for example, the Index and Details views, while maintaining the yyyy-MM-dd format in the Edit view.
ASP.NET Form Grid
The same form grid classes would apply to .NET Core if you wanted a more complicated grid layout.
Creating horizontal forms with the grid classes also works in the same way as it does in MVC 5, so you’ll want to check out my example above if you want to achieve that effect.